


Hi all, Jen Taylor here. I am stopping by today to share a fun page i made of my son. The picture is from a couple of years ago and i just love how happy he was in his monkey t-shirt so i thought the jungle life collection would be a perfect fit to scrapbook this picture.
First, head to fotobella.com and grab the Bo Bunny jungle life i want it all collection and the coordinating Bo Bunny polka dot paper collection


Supplies:
*BoBunny jungle life I want it all collection
*Bobunny coordinating double dot paper bundle
*Simple stories diy twine
* One 4 x6 photo
* Tim Holtz shabby shutters spray ink
* crème glitter paste from my stash
Tools:
• Paper Trimmer
• Scissors
• Foam tape
• Score-tape double sided adhesive
• Washi tape
• Fine tip glue
• Spatula
• Cheetah stencil from my stash
1. First pull the zebra print paper from your collection kit
2. Then grab the distressed brown pattern paper
3. and trim a ¼ inch off the top and the side of the paper.
4. Adhere the brown paper to the center of the zebra print paper so you have a zebra
print frame
5. Next Grab a stencil and spread the texture past through the stencil with your spatula – repeat two more times in different areas around the page . let dry

6. Once the paper is dry cut 4 pieces of twine
7 .Add 3 pieces of twine to the center of the page holding them down with washi tape
8 Then use fine tip glue or thin double sided tape to hold down the twine.( I used both)
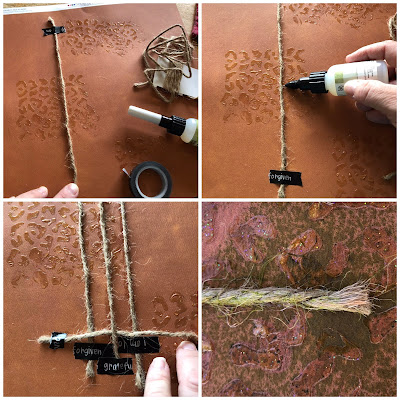

9 Adhere one more piece of twine horizontally

10. Spray your green spray ink in 3 areas around the page..the messier the better
10. Lastly, leave space for a large title
11. Grab the collection thickers alphas and add your title

12. layer the packing from the chipboard dimensional stickers as a mat to the picture and layer cutaparts and stickers behind photo as well

13. add foam tape as needed behind the layers to make it dimensional
14. use the diecut banner and scalloped sticker strip ans add foam tape and pop dots on the backside of them to add layers to the left of the photo
15. Finish with the diecut stars
see close-ups below:

Happy creating!
Jennifer Taylor
awesome layout!
ReplyDelete