Shop FotoBella

Shop for Scrapbooking Supplies by Product Type Shop for Scrapbooking Supplies by Brand Shop for Scrapbooking Supplies by Layout Theme Shop for Scrapbooking Supplies by Color

Search This Blog

Friday, November 30, 2012

Design Team Project - Aspen Frost

Its Jeri here!
Gather some inspiration from these cute Christmas craft ideas from our  Aspen Frost I Want It All Bundle by Basic Grey

Here is a 12x12 layout


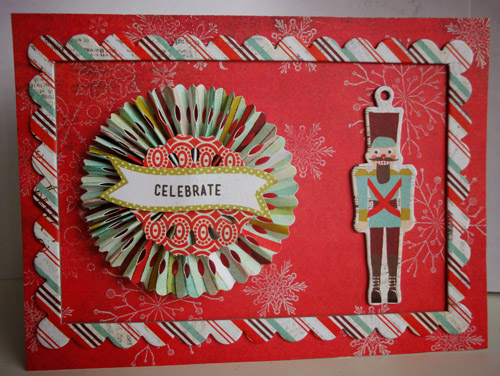
A fun, easy card idea using this great bundle


A cute idea for a place holder


You can also use this amazing paper as wrapping paper for gifts. And create your own custom bow


Homemade Jar – Holiday Gift
Basic Grey – Aspen Frost

Making holiday gifts for friends and neighbors is fun, and is easy on the budget! 
I am using StazOn ink because it is amazing for glass, and most materials that you don’t want it to rub off. Grab a cute saying for the holidays.


Use any type jar you want. My favorite are from sauces or salsas, they are great shapes and sizes. Stamp your saying on the jar. Might take a few times to get it perfect. If you mess up, hurry and wipe it off and try again! 


I love the velvet rub on transfers in this bundle. Cut out some of the designs you like and adhere them to the jar.


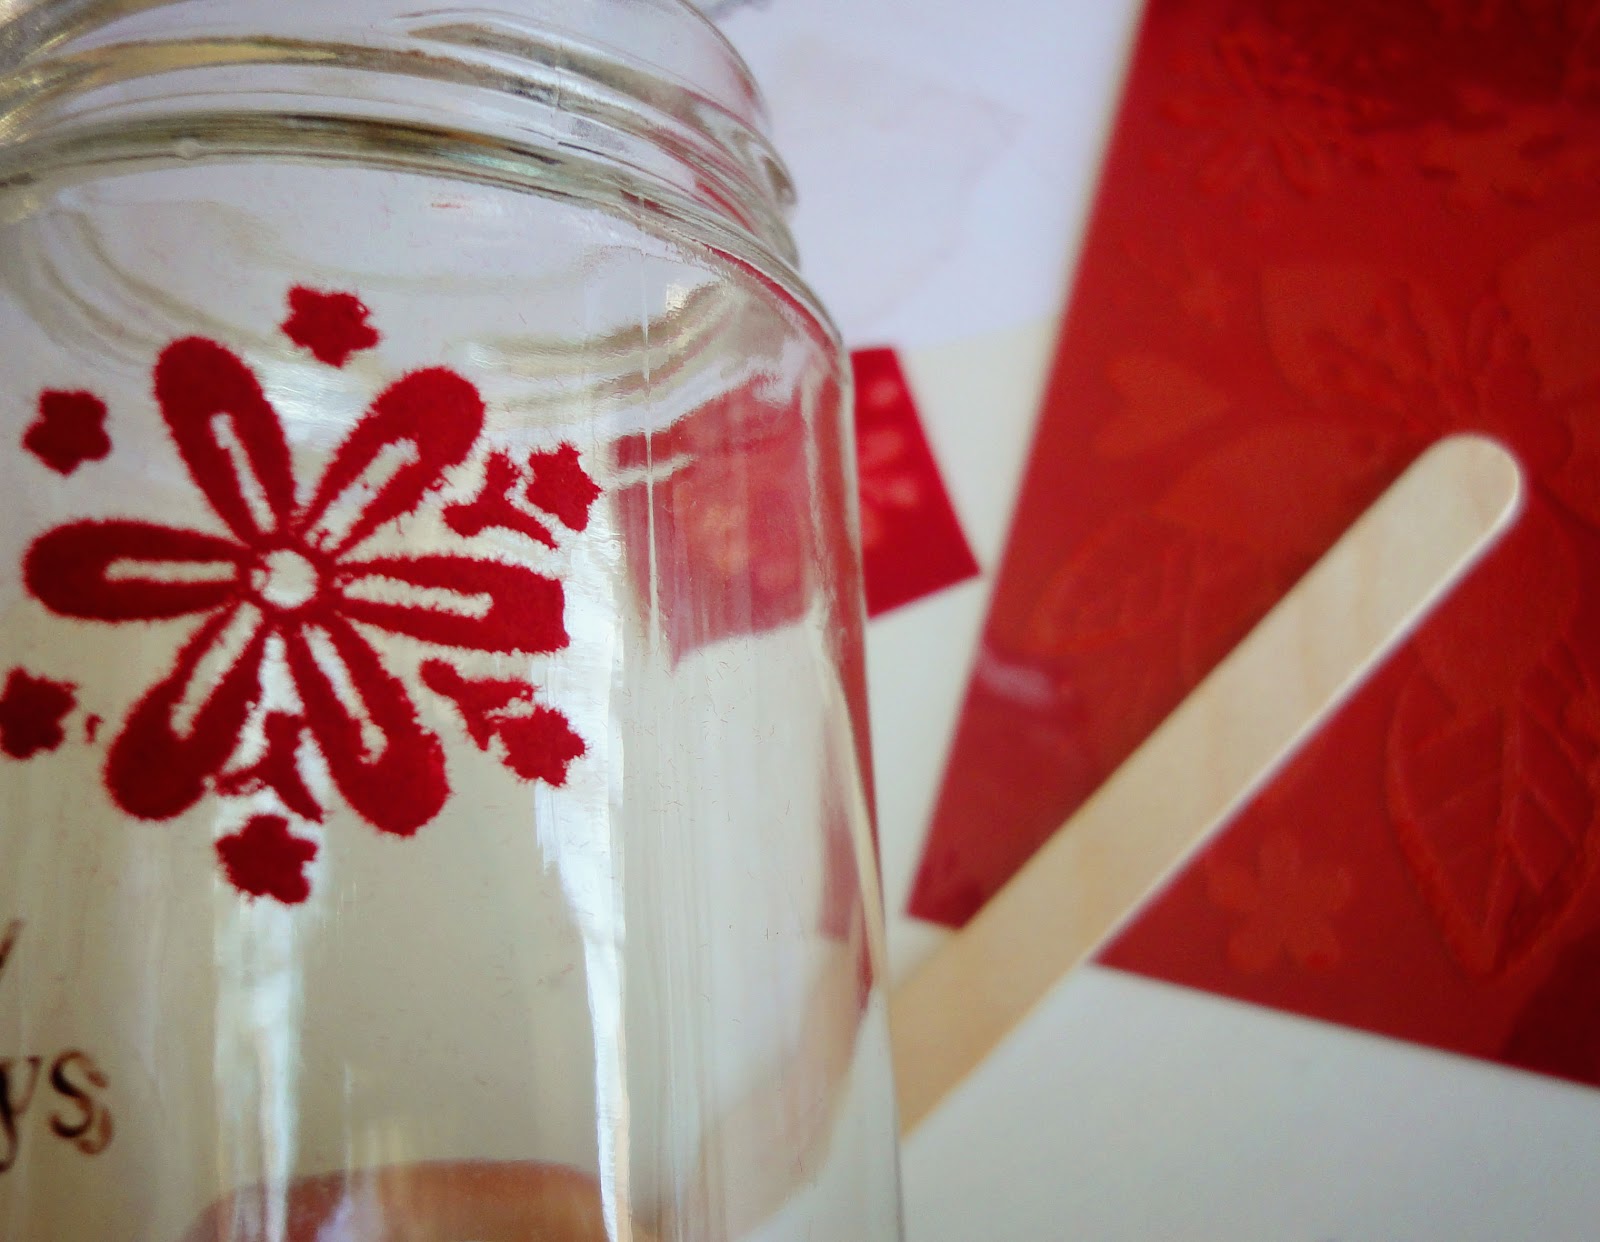
Next, grab a few snowflake or holiday-like stickers and stick them to the jar in whichever order you prefer.  


This bundle has adorable sticker strips. I used this scallop one. Pick one you like, and that fits the width of your lid. Wrap it around the lid, and just trim it to fit. 


To decorate the top of the lid, grab some fabric scraps. I used some left over tea-stained muslin. Cut it in small, ¼” x 2” strips. You can either make a bow out of it, or just crumple the strips up and adhere them to each other. Whichever you think would fit your project best. 


Attach it to the top of your lid. You can use hot glue, super glue, or anything you use. I then used some twine, wrapped it twice around the top of the jar, and attached a couple of the adorable tags from the bundle. I added a matching sparkle snowflake sticker to the tag as well. Whatever makes your gift custom and adorable! 


And here is your finished jar to fill with anything to give as a custom gift!


Enjoy!!

Wednesday, November 28, 2012

Bo Bunny Rejoice Bundle

Unique and Custom Ring

Create so much more with these amazing bundles! 

I love to get creative when making custom jewelry, I love to use uncommon items. When this Bo Bunny Rejoice Bundle came in the mail, and I saw the amazing package of Trinkets, I knew I had to make a piece of jewelry! 

This ring is so simple and easy to make. 
I love using Loctite, its very quick to dry and it is sturdy. 

Choose a Trinket you like, and a ring base. (the ring base does not come with the bundle, but you can buy them at your local craft store)


Dab a little Loctite in the center of the Trinket. 


Be careful when placing the ring base on, because Loctite works so quick, you won't be able to move it once you place it. Hold it for a few seconds. 


 And you have a beautiful new custom ring! 


Holiday Dinner Name Card

Name cards for dinner parties are fun, and show just how much detail you enjoy when planning parties. They are very simple to make.


12x12 Layout

Here is my simple scrapbook layout from this amazing bundle!


Holiday Gift Tag

Sample of a gift tag you can make using the pre-printed tag paper, chipboard, dye cuts, a brad and adding some sequins for eye-catching sparkle!


Thank you for viewing my creations. I hope you enjoyed it, and got inspired to create!

Jeri <3


Tuesday, November 27, 2012

Using Paper Crafting for your Holiday Party

If you love crafting like we do, then most likely you try to incorporate projects into every part of your life. 

Here are a few creative ideas for how to use an amazing bundle from the Fotobella Store to help decorate your holiday party this year.


This bundle comes with decorative pre-cut 12x12 pages, which are perfect to use as place mats for your table setting. They are creative, and will definitely draw attention. Use them on top of a square 12x12 paper for more layered detail. 


Use a contrasting stripe patterned paper to make napkin rings from. Simply cut strips 1 1/2" wide, wrap around the napkin, cut to fit and glue ends together.


Grab some rafia or thin ribbon to tie around the paper napkin ring, and thread through some of these matching buttons. Simply tie a knot in the rafia or ribbon to keep button in place. Very creative, unique and easy! 


Find a clear pitcher for the drink, and use these cute stamps to add some unique festive detail. Choose ink colors to match, and stamp away! 


Now, go create and decorate! 
Find all the supplies you will need here!


Sunday, November 25, 2012

Merry Christmas Cards We R Memory Keepers-Yuletide


Hello Everyone!

It's Apryl with the Fotobella Design Team.  It’s time to get together and make holiday cards!  Here are a few cards that I put together using the We R Memory Keepers Yuletide-I Want It All Bundle. 


The Yuletide Collection is perfect for those who love traditional Christmas colors and phrases! 

Here’s a step-by-step tutorial to make the Merry Christmas Card:

       1. Choose Dot Paper Side B and cut a 12 in. x 5 in. piece of paper using your paper trimmer.
       2. Fold in half length wise. This will be the base of your card.

       
       3. Using a corner rounder, round the four corners at the bottom edge of the card.


      4. Choose the Partridge Paper and place the paper about two thirds up the Wood grain paper of your card base.
      5. Trim to fit.
      6. Using the corner rounder, round the bottom corners of the Partridge Paper.
      7. Adhere the Partridge paper piece to the bottom two thirds of the card base. 

    8. Select the Poinsietta Paper and cut a strip 5 in. long and wide enough to have an entire row of white Poinsiettas. 
    9. Adhere the strip over the seam of the Partridge Paper and Wood Grain Paper. 
      10. With your scissors, hand cut out a white Poinsetta from the sheet of Poinsetta paper. 

       11. With a paper piercer, pierce a hole in the center of the Poinsetta you just cut out.

       12. Select the white crochet flower and use a red brad to secure the Poinsetta to the center
        of the crochet flower.

13. Select the embossed Merry Christmas die cut tag.
14. Ink the edges of the tag with red ink.
15. Tie the red/white polka dot ribbon through the hole at the top of the die cut.
16. Adhere to the right center of the card using popdots.
         17. Adhere the crochet flower embellishment you made to the left of the Merry Christmas
              diecut using a glue dot.
  
     18. With the brown Stickles, outline the strip of red Poinsietta paper edge on the top and bottom.


                        19. Ink all the edges of the card with red ink.
And that's not all I have for you.  Check out the tag I made that can also be used as a gift card holder.  Hang it on the Christmas tree until gift giving time.  I like to have extra gifts "hanging" around for those unexpected visitors who might pop in for some holiday cheer.  You don't want them to  leave empty handed do you?  Hang a couple of these  on  your Christmas tree with gift cards in them and you won't disappoint.


Hope you all have a very happy holiday season!


Friday, November 23, 2012

Christmas Countdown and a Festive Page

Hi Everyone! Lisa here and I am so excited to be sharing my first designs for Fotobella!! I have been creating some lovely projects with the gorgeous Christmas Cottage 12x12 Bundle #2 by Teresa Collins and I am very excited to share  them with you today!

I want to start by sharing an advent countdown calendar I created using this collection.


Here are some basic steps so you can create a calendar just like this.


Step One: Cut the patterned paper in any size and patterns you wish to create a base design. I chose three patterns for the base that would fit nicely on a 10x10 magnetic whiteboard easel which I describe in my video below. You could also make this any size you wish to place on your refrigerator. I then cut four triangles that will be used for the tree on my calendar. I decided to use only the green patterns for the tree to keep it as "real" as I could.


Step 2: Next, I stitched my base pieces together. I stitched the first two together, the smaller paper on top of the larger, then added the smallest piece to one side. This is where your numbers will be added to the design.


Step 3: Next I decorated the tree. I started by added some brown ink (from the marker, not included in the kit) around the edges of each of the triangles. I layered the four triangles, the smallest at the top working the way down to the largest on the bottom. I added bits of washi and stitched across each of them. Lastly, I added pearls and gems here and there on the tree, creating little decorations.


Step 4: I added magnets to the back of the chipboard element numbers one through twenty-five, with the adhesive paper still on them. Next, I punched them out of the board and placed them on my design. 


Step 5: Now you can count the days down together. You can decorate your little tree with the numbers as the days pass, or place them on the back of the whiteboard (or side of the refrigerator). So fun, huh? It is so pretty, yet so simple to create!


for more detailed description and more views of the project here is a video I created for you, too:


Next, I was able to use my leftovers (this kit is very large and I am still planning to create a few tags and cards).

"Celebrate December"


 everything is from the kit, except the gesso and these epoxies punched with the Epiphany Crafts shape makers found in the store


Are you planning to do a countdown? I would love to see your countdown calendar, so if you make one leave a comment and I will come see what you have made. Make sure you check out this kit if you would like to make one like I have shown today!

Have a great day! Happy Crafting!