Shop FotoBella

Shop for Scrapbooking Supplies by Product Type Shop for Scrapbooking Supplies by Brand Shop for Scrapbooking Supplies by Layout Theme Shop for Scrapbooking Supplies by Color

Search This Blog

Showing posts with label die cuts. Show all posts

Friday, June 23, 2017

Julie Nutting: Seeds of Kindness


Designer Julie Nutting has created a paper collection by Photoplay called "Seeds of Kindness" --an inspiring scrapbooking collection of gentle florals and beautiful garden decor, with sweet whispers of pink and yellow flirt with lovely hues of lavender and teal, all wrapped up in accents of soft greys.  
In the Julie Nutting Seeds of Kindness collectionher popular hand-drawn dolls make another appearance, here in the form of die cuts! 

The Seeds of Kindness Ephemera Die-Cuts which I am featuring today, coordinate perfectly with the PhotoPlay Julie Nutting Seeds of Kindness 12x12 Patterned Paper and the 6x6 paper padsEach die cut pack comes complete with 6 cards, the doll, her clothes and lots of fun accessories! 
They would be great for creating a scrapbook layout, handmade card or your own fun paper craft creation.
ReNae here, with the FotoBella Design Team.  I used the doll die cuts as a fun and easy way to create a set of greeting cards!  
All you need is some card stock and adhesive and you have a card! And the sentiments are so sweet!   

Click here to order your own Julie Nutting Seeds of Kindness paper collection!  

Happy Creating!
ReNae
  

Saturday, March 11, 2017

Kiss the Cook!

Hi everyone, ReNae here! Today's post features a project I designed using the Bo Bunny Kiss the Cook "I want it all Bundle" at FotoBella.com . This bundle was loaded with fun diecutslayered chipboardbuttons, colorful stickers, pretty blossoms and all kinds of ephemera, in addition to the amazing papers!  I had no trouble thinking up fun projects for this collection! 


Today's project is a Recipe Album.  I used the paper collection to dress each of the twelve dividers, front and back, and used the other wonderful products in the bundle to embellish each divider. I punched five holes in each divider and attached them to an acrylic stand.  (Note: Recipe cards can later be added to the file in the appropriate section behind the dividers).


The first step was inking up the dividers.  Since I had twelve dividers I separated them into groups of four colors.  Using pigment ink, I colored the dividers just around the edges, as I knew I would be covering up the majority of the space with paper,  so no need to waste the ink.

The next step was to cover the dividers with the patterned paper.  I cut the paper so as to leave a 1/4 inch border all around the edges.  I used my corner rounder to soften the corners and adhered the paper to the divider.  Five holes were punched into each divider using my Big Bite. 
After the paper was adhered, I placed stickers on a couple of the pieces of ephemera, creating my own personal stickers. Then I embellished the dividers as shown below.  Since I used a flip-type album, I tried to embellish both sides of the divider when possible because both sides would be visible.  And sometimes, I let the paper speak for itself.  Here are the finished dividers.  Enjoy!

Made the sticker


Page 1
Pages 2 and 3


Pages 4 and 5


Pages 6 and 7


Pages 8 and 9


Pages 10 and 11


Pages 12 and 13


Pages 14 and 15


Pages 16 and 17


Pages 18 and 19
Pages 20 and 21


 Pages 22 and 23


Recipe albums are also good for memory keeping.  To preserve a fun cooking memory one could easily incorporate a photo and journaling spot instead of a recipe card.  And what a great project to do with your children or Grandma.  Be creative!  Have fun!  And always start with an "I want it all Bundle" from FotoBella.com!

This scrapbooking kit includes 2 sheets of 12 papers in the BoBunny Kiss the Cook collection (Kiss the Cook Paper, Kiss the Cook A La Mode Paper, Kiss the Cook Apple Pie Paper, Kiss the Cook Baked Fresh Paper, Kiss the Cook Cinnamon Paper, Kiss the Cook Delicious Paper, Kiss the Cook Family Recipe Paper, Kiss the Cook Farm Fresh Paper, Kiss the Cook Menu Paper, Kiss the Cook Pantry Paper, Kiss the Cook Quilt Paper, Kiss the Cook Yummy Paper), plus all of the embellishments: 1 sheet Kiss the Cook Foil Vellum Paper, Kiss the Cook Combo Sticker, Kiss the Cook Noteworthy, Kiss the Cook Layered Chipboard, Kiss the Cook Ephemera, as well as coordinating Bo Bunny Essentials: Wildberry Zinnia, Double Dot Mocha Jewels, Double Dot Citrus Brads and the exclusive FotoBella Paper Organizer.


Monday, January 12, 2015

Pretty Cards are on the Menu at Bo Bunny's Rose Cafe'

If you enjoy making cards as much as I do, 
you will LOVE the Rose Cafe paper collection by Bo Bunny!

Rose Cafe' features a gorgeous paper collection with color combinations such as bright yellow, various shades of blue, a mossy green, burgundy, brown and pale rose!  It's a perfect collection for any paper crafter because it's so versatile! 

When you purchase the Rose Cafe' "I want it all Bundle" by FotoBella, 
you will receive beautiful die cuts, layered chip board images, stamp stickers, pretty ribbons, gemstones, buttons, brads and other fun ephemera to create gorgeous one-of-a-kind cards. 

In addition to the Bundle, The Rose Cafe' collection can also be purchased separately here.
Today I am showcasing two beautiful cards and simple variations on each, 
made with papers and embellishments from the "Rose Cafe' I want it All" Bundle.
This card features a resin frame and some gold trims and yellow roses. (from my own collection) 
You can find hundreds of beautiful rosesflourishes and other ephemera in our online store.
I trimmed the die cut image of the bird to fit the little resin frame! 
close-up
See how the bird image from the Noteworthy pack appears to actually be soaring in the clouds!
This card features a vintage button, a flower and layered chipboard
from the Rose Cafe Ephemera Pack
Close-up of layered chipboard
Close-up showing detail of beautiful papers
The little butterflies are made from vellum
 In this version of the elegant card, I used gold roses instead of yellow roses 
and added two large pearls to the frame.
In this version of the Flower card, yellow roses were added near each vellum butterfly.
The Rose Cafe collection by BoBunny is beautiful and versatile!
It's paper collection and it's ephemera packs are perfect for making gorgeous handmade cards.
But there is more on the menu than cards at the Rose Cafe'!  Check back soon to see what I mean!

Until then, 
Happy Creating!
ReNae


Monday, December 15, 2014

Hannah's Happy Happy So Very Lovely Good Day Layout

Every time I picked up the Vivienne "I want it All!" Bundle from FotoBella, I found that it made me feel happy!  So I thought, "what better paper to use for this special photo of a very special little girl, than Vivienne, by Basic Grey?"  I found that it reflected perfectly the mood of this particular day, Hannah's special day spent camping with her Dad.

The  pretty colors of patterned paper go with almost any event you want to document, and the textures of the various chipboard pieces. acetate overlays, and resin flowers will add lots of dimension to your project.  

I just built  the "flower frame" around the photo image, using all the wonderful embellishments that come with the 
Vivienne I want it All! Bundle

Everything you could possibly want for a beautiful scrapbook layout is here! Vivienne's Bundle includes chipboard pieces, acetate overlays, resin flowers, die cuts and transparencies, and they all coordinate beautifully!

I can almost feel the fresh air, smell the flowers, and hear the birds chirping as it takes us back to that summer day so long ago...Hannah's happy happy, so very lovely good day!
  

Vivienne I want it all Bundle, makes any project a breeze, and is a great way to document your own 
"Happy Happy So Very Lovely Good Day"!


Happy Creating!
ReNae

Wednesday, November 26, 2014

Bundle 101, A Tutorial

When I opened up my first Bundle from FotoBella.com,  I was delighted to see that I received the Vivienne "I want it all Bundle" from Basic Grey!   The colors in this collection are gorgeous!  And the patterns on the Designer Paper are reminiscent of beautiful quilt fabrics you might find in your Great Grandmother's old trunk.  Soft beautiful pastels, contrasted with deep browns and earthy pale yellows...It is simply yummy!  There are lots and lots of coordinating embellishments with the Vivienne   "I want it all" Bundle, so many that they barely fit in the photograph!  But good news!  To help you keep everything together and organized your Bundle is delivered inside of a handy FotoBella Storage Organizer!  How great is that?!


Included is this gorgeous Designer Paper, (24 sheets and 3 sticker sheets), Die cuts and Transparencies, Chipboard shapes and Alphas, and cute little Frames with acetate overlays.  There are Resin Flowers,  Laser Wood Stickers, and 2 sets of Hero Arts Stamps (Good Day and Sweet You).

Buying a Bundle is definitely the best way to save money on your favorite Paper Collections, however, it may be a bit overwhelming when it first arrives. And especially when you see all the wonderful embellishments and accessories that come with it!  So let me share with you my method for "deconstructing a bundle" and show you how you can create multiple projects with just one purchase. By going through a few simple steps, you can organize and plan your paper crafting projects, and get the most out of your crafting budget!

Step 1. Organize your Designer Paper.

On a large table, or work area, place the papers side by side in a big paper fan.  I put mine in order of color, darkest to lightest.  Since there are two sheets of each design paper in the bundle, you can actually see each and every paper when you do this.  It gives you an idea of what colors you are working with, and ultimately which papers you will choose for your projects.

Step 2. Organize the Embellishments and Stickers


There is a LOT MORE to a FotoBella I want it all Bundle than just paper!  Lots more!
Open up all the packages of embellishments and lay them out on a big table.  This allows you to actually see what you have to work with.  You will be pleasantly surprised at how many wonderful stickers, chipboard pieces and other fun embellishments there are to a FotoBella bundle!  Are your creative juices flowing yet?


With the Vivienne Bundle, you receive acetate frames and embellishments.  I would recommend putting a white piece of paper under the frames so that you can easily see their size, shape, and how cute they are!  Keeping them stored in their packaging does NOT do them justice!  At this point you can start to group similar items together, so that when you're designing your project you can find things easily.  Move the pieces around, the ideas for projects will really start to happen now!

Step 3.  Integrate your style into the Bundle


Now it's time to integrate your own special style into the Collection.  Chances are you have a "Stash" of supplies that you commonly use.  Things that you use that add that signature touch to your projects.  Find inks, ribbons, trims and buttons from your own stash and put them on the table with the Bundle.  Look at all these gorgeous colors and textures!  Can't you just imagine how pretty your projects will be with this Vivienne "I want it all Bundle"?

With so many wonderful papers and embellishments at your fingertips, it will be a breeze to create beautiful projects for your family and friends.  So let's do just that! 


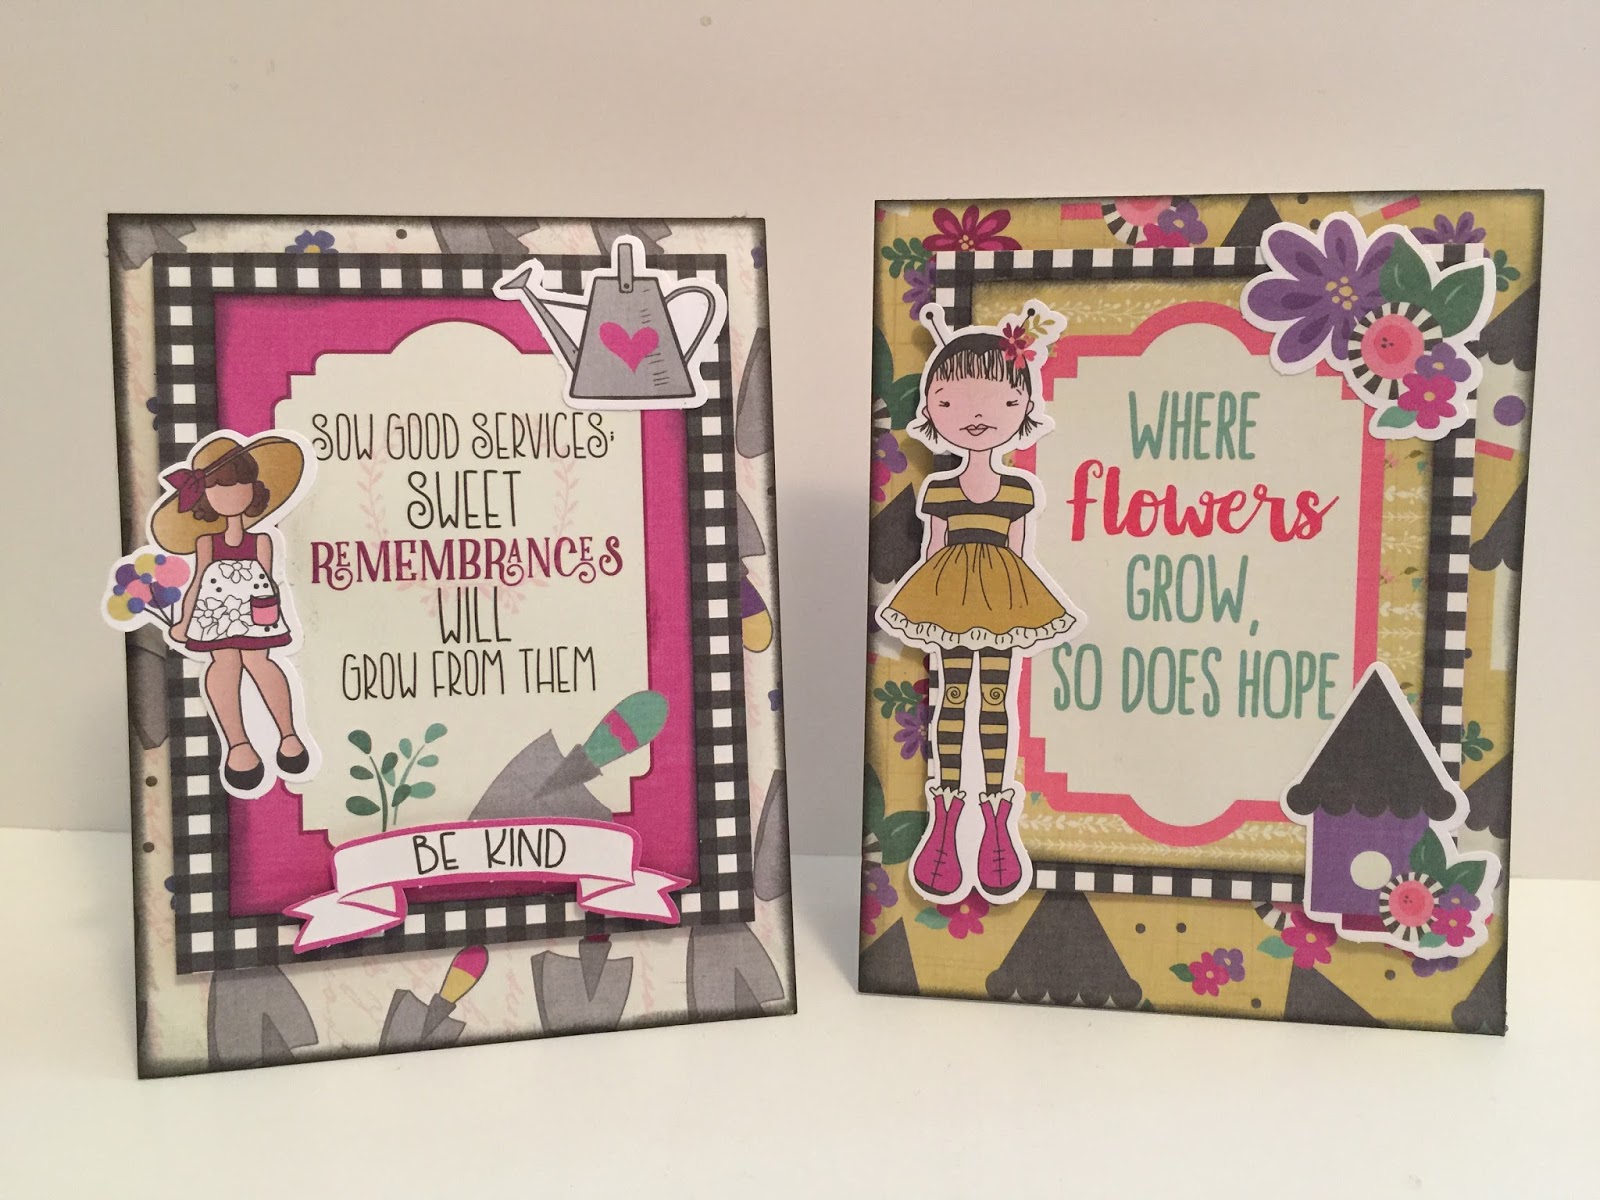
Here is a pretty Friendship card I made using only what was in the Bundle.  
It's quick and easy so let's get started!

You will need:
Embossing Buddy or Talcum Powder


Begin with an A2 size card.  A2 cards are 4 1/4" x 5 1/2".
Cut a piece of 8 1/2" x 11"  card stock in half horizontally.  Make the cut as shown.

Score the card stock at 4 1/4" and burnish the fold with a bone folder.

Cut two pieces of Design Paper as shown.  
Brown patterned paper: 2 1/2"  x 5 1/2", Green patterned paper: 2" x 5 1/2"
Set Sticker sheet next to your project.

Adhere the Green patterned paper on the bottom half of the card.  
Adhere the Brown patterned paper to the top of the card.  It will overlap the Green paper slightly.  

Remove the sticker border from the sticker sheet 
and adhere to the card on the line where the two papers meet.

 With Vintage Photo Ink, distress the edges of the card if desired.

Remove the Friend sticker from the sticker sheet, and set on craft sheet or in a tray.

Using an Embossing Buddy, or Talcum Powder, dust the back side of the sticker, 
completely covering the adhesive. 

Using Pop Dots or dimensional tape, adhere the Sticker to card front, right along the seam line. Adhere the back of the arrow to the card with pop dots, and the front of the arrow to the Friend sticker.

Adhere a green and brown chipboard "corner" to the card on opposite sides, and add a flower sticker. 
Add green gemstones in corners if desired.  Now your card is ready to send to your best friend!


The possibilities are endless with the Vivienne Bundle from Basic Grey!  From Scrapbook pages, to home decor projects for your home, you will find countless ways to use this amazing bundle!  
And of course, it's just perfect for making cards. 


Happy Creating!
ReNae