Shop FotoBella

Shop for Scrapbooking Supplies by Product Type Shop for Scrapbooking Supplies by Brand Shop for Scrapbooking Supplies by Layout Theme Shop for Scrapbooking Supplies by Color

Search This Blog

Friday, November 28, 2014

Blessed layout

Welcome to the blog today FotoBella fans!  Have you seen the We R Memory Keepers Shine Collection?  If you haven't, then you should really check it out.  It's a great them and color scheme for your fall photos. 

We don't get a lot of fall colors here in Southern California, especially by the beach.  I went digging through my photos and came across some beauties from when we were in Aspen, Colorodo in October, 2012.  Perfect. Fall. Scenery.


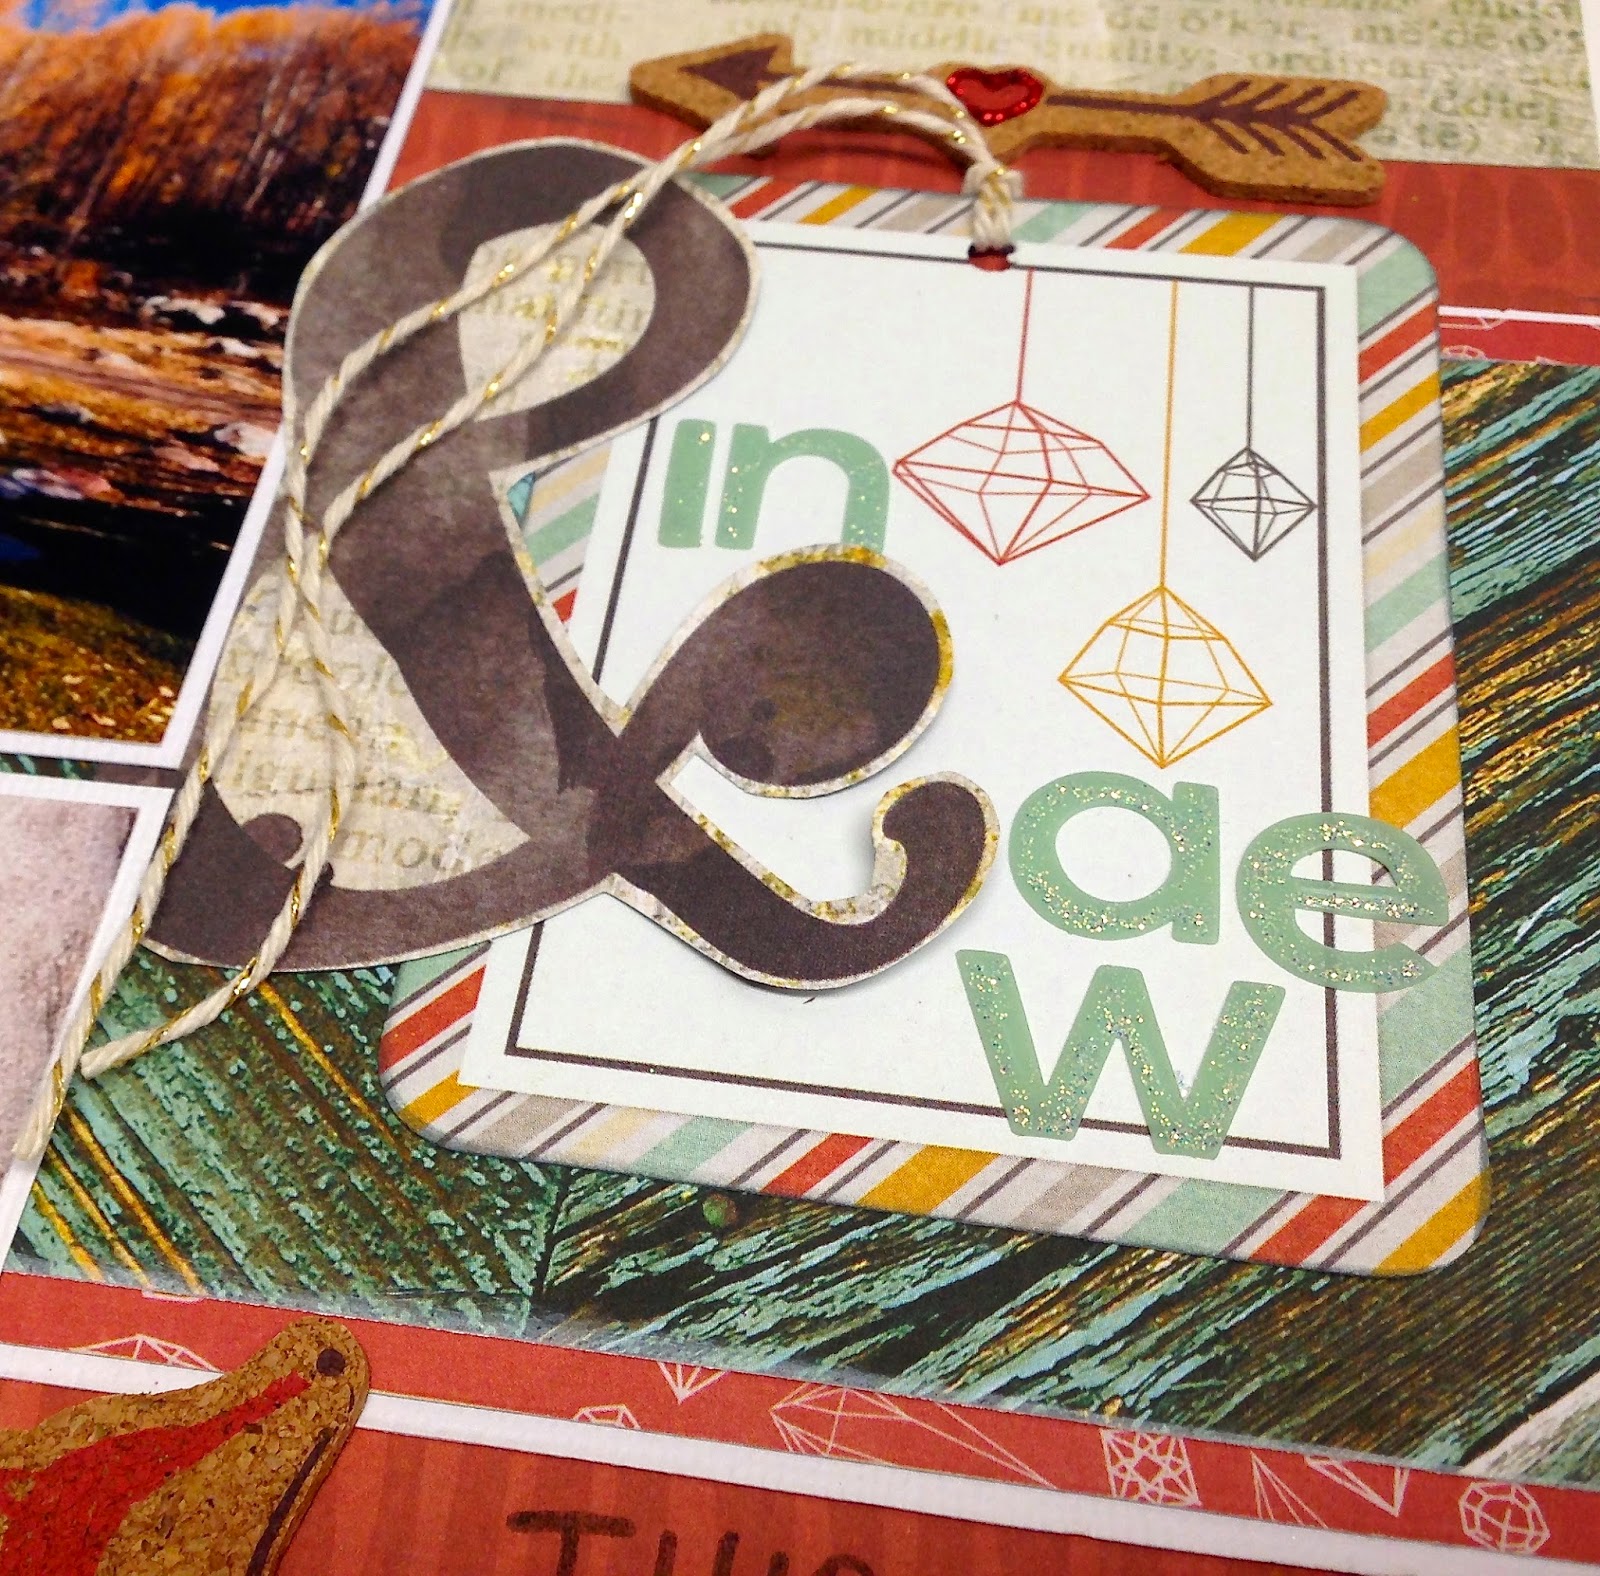
I love this photo taken on a bridge just outside of downtown.  I wanted to make it the centerpiece of my layout.  I used a lot of layering, mounting the journal cards front the Albums Made Easy card set and my matted photo with pieces of chipboard behind each one.


I placed some straw colored raffia behind the layers on the page to add to the "nature" look of page.  

One of my favorite items in this collection is the cork stickers.  To add a little shine I embellished the cork with Stickles and Glossy Accents.  The Shine Collection really got me excited to scrap the rest of my photos from this trip, so stay tuned this month to see what else I've got in store!  In the meantime, visit FotoBella.com to get your bundle.  


Have a fabulous day!

Wednesday, November 26, 2014

Bundle 101, A Tutorial

When I opened up my first Bundle from FotoBella.com,  I was delighted to see that I received the Vivienne "I want it all Bundle" from Basic Grey!   The colors in this collection are gorgeous!  And the patterns on the Designer Paper are reminiscent of beautiful quilt fabrics you might find in your Great Grandmother's old trunk.  Soft beautiful pastels, contrasted with deep browns and earthy pale yellows...It is simply yummy!  There are lots and lots of coordinating embellishments with the Vivienne   "I want it all" Bundle, so many that they barely fit in the photograph!  But good news!  To help you keep everything together and organized your Bundle is delivered inside of a handy FotoBella Storage Organizer!  How great is that?!


Included is this gorgeous Designer Paper, (24 sheets and 3 sticker sheets), Die cuts and Transparencies, Chipboard shapes and Alphas, and cute little Frames with acetate overlays.  There are Resin Flowers,  Laser Wood Stickers, and 2 sets of Hero Arts Stamps (Good Day and Sweet You).

Buying a Bundle is definitely the best way to save money on your favorite Paper Collections, however, it may be a bit overwhelming when it first arrives. And especially when you see all the wonderful embellishments and accessories that come with it!  So let me share with you my method for "deconstructing a bundle" and show you how you can create multiple projects with just one purchase. By going through a few simple steps, you can organize and plan your paper crafting projects, and get the most out of your crafting budget!

Step 1. Organize your Designer Paper.

On a large table, or work area, place the papers side by side in a big paper fan.  I put mine in order of color, darkest to lightest.  Since there are two sheets of each design paper in the bundle, you can actually see each and every paper when you do this.  It gives you an idea of what colors you are working with, and ultimately which papers you will choose for your projects.

Step 2. Organize the Embellishments and Stickers


There is a LOT MORE to a FotoBella I want it all Bundle than just paper!  Lots more!
Open up all the packages of embellishments and lay them out on a big table.  This allows you to actually see what you have to work with.  You will be pleasantly surprised at how many wonderful stickers, chipboard pieces and other fun embellishments there are to a FotoBella bundle!  Are your creative juices flowing yet?


With the Vivienne Bundle, you receive acetate frames and embellishments.  I would recommend putting a white piece of paper under the frames so that you can easily see their size, shape, and how cute they are!  Keeping them stored in their packaging does NOT do them justice!  At this point you can start to group similar items together, so that when you're designing your project you can find things easily.  Move the pieces around, the ideas for projects will really start to happen now!

Step 3.  Integrate your style into the Bundle


Now it's time to integrate your own special style into the Collection.  Chances are you have a "Stash" of supplies that you commonly use.  Things that you use that add that signature touch to your projects.  Find inks, ribbons, trims and buttons from your own stash and put them on the table with the Bundle.  Look at all these gorgeous colors and textures!  Can't you just imagine how pretty your projects will be with this Vivienne "I want it all Bundle"?

With so many wonderful papers and embellishments at your fingertips, it will be a breeze to create beautiful projects for your family and friends.  So let's do just that! 


Here is a pretty Friendship card I made using only what was in the Bundle.  
It's quick and easy so let's get started!

You will need:
Embossing Buddy or Talcum Powder


Begin with an A2 size card.  A2 cards are 4 1/4" x 5 1/2".
Cut a piece of 8 1/2" x 11"  card stock in half horizontally.  Make the cut as shown.

Score the card stock at 4 1/4" and burnish the fold with a bone folder.

Cut two pieces of Design Paper as shown.  
Brown patterned paper: 2 1/2"  x 5 1/2", Green patterned paper: 2" x 5 1/2"
Set Sticker sheet next to your project.

Adhere the Green patterned paper on the bottom half of the card.  
Adhere the Brown patterned paper to the top of the card.  It will overlap the Green paper slightly.  

Remove the sticker border from the sticker sheet 
and adhere to the card on the line where the two papers meet.

 With Vintage Photo Ink, distress the edges of the card if desired.

Remove the Friend sticker from the sticker sheet, and set on craft sheet or in a tray.

Using an Embossing Buddy, or Talcum Powder, dust the back side of the sticker, 
completely covering the adhesive. 

Using Pop Dots or dimensional tape, adhere the Sticker to card front, right along the seam line. Adhere the back of the arrow to the card with pop dots, and the front of the arrow to the Friend sticker.

Adhere a green and brown chipboard "corner" to the card on opposite sides, and add a flower sticker. 
Add green gemstones in corners if desired.  Now your card is ready to send to your best friend!


The possibilities are endless with the Vivienne Bundle from Basic Grey!  From Scrapbook pages, to home decor projects for your home, you will find countless ways to use this amazing bundle!  
And of course, it's just perfect for making cards. 


Happy Creating!
ReNae


Meet ReNae!

We would love to introduce our newest design team member ReNae!

Please take a moment to read her bio, and stay tuned later today we will post her first tutorial on her experience with a FotoBella Bundle!


My name is ReNae Allen and I love to create!  I have loved art, crafts, sewing and making jewelry for as long as I can remember, and that's a long time!  I am an empty-nester, a new Grandma, and one more thing.  I have a disability. 
I have never let it get in the way of what I want to accomplish, but after my last surgery,(my 32nd) I finally had to stop working.  

Never one to sit still very long, I decided that this was a good time to concentrate on my creative side!  I discovered paper crafting was something I thoroughly enjoyed, and I began making cards.  Pretty soon people were asking me to show them how I made my cards, which combined my sewing, jewelry, and other art experience.  I make my cards with lots of layers and texture.  And I LOVE color!   My design aesthetic is vintage/shabby chic, so I love using old lace, buttons and other ephemera in my designs.

I have been teaching part time at a local store, and have been a part time blogger as well.  But nothing could have prepared me for the exciting role I was about to play, that of Design Team member for FotoBella.com!  I hope you all will enjoy this new journey with me.  I know I have a lot to learn, but I am looking forward to sharing with you my design process and how I go about creating fun and pretty one-of-a-kind projects!

Happy Creating!
ReNae


Tuesday, November 25, 2014

Another Basic Grey Highline Layout

     Hello! Drea here with another layout using Basic Grey's Highline I Want It All Bundle from FotoBella. I decided to scrap these old photos of me at sixteen modeling a new outfit in front of my house. They were just the right size for the Frames With Acetate Overlays.


     The top tag has a photo backed on some paper I used from the 12 x 12 Collection Pack. I tied some black fiber though the punched hole, and added a flower at the bottom, from the Die Cuts and Transparencies, which I used though out this page. The title was masked with Black Soot Distress Ink and the Cargo Alphabet Stencil from Tim Holtz. 


     I used all of the colors in the alpha sticker sheet, that comes in the 12 x 12 collection pack, to create some phrases from the Valley Girl song.  The awesome tag comes in the Mixed Brads , and I anchored it with Printed Chipboard Shapes, which I also used for the arrows going down. On the photo frame on the right, I applied some Vellum Tape.


     Here's a closer look at the other photo frame. I used a black Sharpie to write in the bubble, and that's exactly how I like my name pronounced. Lol! I finished the whole page off with some hand-stitching around the border.


          Thanks for your visit!


Monday, November 24, 2014

So Grateful Layout

Hello there.  If you have been following my posts this month, you may think I'm obsessed with this We R Memory Keepers Shine Bundle.  Well, you are right, I'm OBSESSED!  I don't know if it's the colors, the cute owls and fox cork stickers, the fabulous journal cards or WHAT!?!  But I have made a ton of layouts with this collection!


The theme of this layout is "Grateful".  Yes, these are more photos from Aspen, but aren't they beautiful?  I'm grateful I got to experience such beauty, serenity and peace this awesome place provides.    


I absolutely had to use the giant ampersand in this layout.  It worked beautifully to tie my title together "So Grateful & In Awe".  I fussy cut the ampersand out of one of the journal cards from the Albums Made Easy Card set.   Added a little twine, some Stickles to the alphas and cork stickers and I think it gave it just the right touch.  


Gotta love that cute little fox also!  You can find all this fabulous stuff at FotoBella.com.  Thanks for stopping by today.

Have a fabulous day!


Saturday, November 22, 2014

I Love Aspen Layout

FotoBella Fans!  Hello!  I'm sharing a layout today with photos from the John Denver Sanctuary in Aspen, Colorado.  The photos from the trip were perfect for the We R Memory Keepers Shine Collection.  


This collection has a few embellishments with it, but for the most part, I fussy cut a lot for a lot of my embellishments on tis page.  It really brought the page to life, in my opinion and this layout is one of my favorites.  


Everything you see on this page from the tree, dear head, hearts, owl, leaves, all fussy cut from the Journal Cards in the Albums Made Easy Card Set.  I added some Stickles, glossy accents and twine to the mix as well.  


I inked the edges on EVERYTHING!  Between the cutouts, the inking and the added shine, this layout came out with some great dimension and character.

Have a fabulous day!


Friday, November 21, 2014

Dear Santa Layout

FotoBella.com is the place to find a great Christmas collection by We R Memory Keepers.  It's the North Pole I want it all bundle and it is perfect for those holiday projects you've been waiting to start.  This collection has the classic colors and patterns.  


There are some fun snowflake stickers I couldn't wait to use in this collection.  I adhered them to the layout with foam squares to give them some dimension and coordinate with the snow flake patterned paper I used for the background of the layout.


When I saw the alpha stickers I was really excited to use them.  They are really cute!  I had a bunch of titles I wanted to use, and settled on this one (so I'd have enough letters, ha!).


Silver Stickles added some sparkle to the center of the snowflakes and ran it along the edge of the photo to frame it out with some bling!  Visit FotoBella to see this bundle for yourself.

Have a fabulous day!

Thursday, November 20, 2014

The Best Wonder Mom Gift Card Holder Card Tutorial


Supplies:
Orion Sheet
Die Cut Letters
Clear Stamps
Die Cut Cardstock & Transparencies
Chipboard Stickers 
Stickers
Gold Ink Pad
Teal Ink Pad
Glue Dots
Double Sided Tape
Embossing Ink & Powder
Glue Stick

Tools:
Scissors
Paper Cutter
Ruler
Scoring Knife
Heat Gun
Cotton Swab
Stencil

Cut a 11.5” x 4” piece out of the Orion Sheet.


With a ruler or straight edge and a scoring knife, score lines widthwise, at 2.5”, 3.5”, 4.5” and 9”.


Fold the paper strip as pictured.
 

Choose a shape you would like for the gift card slot. I decided to go with a triangle. Trace the line you want to cut on the fold flap pointing up. With scissors, cut the shape.


With a glue stick, glue the up flap closed. Make sure to keep the area where the gift card will be placed, un-glued. Make sure your gift card will fit, and then press until dry.


With your Gift Box Punch, cut notches in the right side end, .75” in from both ends. ft card will fit, and then press until dry.


 With your choice of stencil and ink color, use a cotton swab to ink some fun designs on the inside, focal point of the card. 


Grab some colorful embossing powder, embossing ink and the triangle and diamond shaped clear stamps from your bundle.


 Place the stamps randomly, sprinkle embossing powder and seal with your heat gun. 

 
Find this Remember This die-cut and ink the edges with a gold ink pad.

 
Secure the die cut tag to the inside of the card. Choose some paper die cuts and transparencies and secure around the tag as you like.


Ink all edges of the inside of the card with a matching ink pad.


Ink all edges of the outside of the card with a matching ink pad.


Find the pictured Chipboard Stickers, Chipboard Letters and Die Cut Stars. 

 
Layer up your chipboard on the Polaroid frame. Then cut off the backing as pictured. This will only be secured to the left side of the front flap, so you do not want to remove the entire backing of the sticker.
 

Secure your chipboard embellishments to the front (left flap) of the card. 


Layer on the die cut stars.
 
 
Your card is now finished!