Shop FotoBella

Shop for Scrapbooking Supplies by Product Type Shop for Scrapbooking Supplies by Brand Shop for Scrapbooking Supplies by Layout Theme Shop for Scrapbooking Supplies by Color

Search This Blog

Tuesday, October 31, 2017

Halloween Art Journal Spread

Happy Halloween from all of us at FotoBella

     Drea here with the Design Team, and I created this spooky spread in my art journal with some mixed media done on a painted background using Dylusions Paints.


     With my fingers and some water, I applied Squeezed Orange, Tangerine Dream, and Funky Fuchsia to the page on the right, pressing the one on the left onto it to reveal it's mirror sky image.


     Then I used my Mini Blending Tool with a circle stencil to make the setting sun, with Pure Sunshine Dylusions Paint. The witch, like most of the other stamping was done with Ranger's Archival Jet Black Ink and embossed with Ranger's Rainbow Sparkle Embossing Powder using Graphic 45's An Eerie Tale Stamp. The broom was made from a scrap of paper, rolled up, and glued to some rope fibers.


     The trees were made with my Cricut Expression cut from black cardstock that I coated with Black Diamond Stickles. Then I used an older Prima stamp to emboss the fence, adding grass along the bottom with some fibers.


     Instead of a haunted house, I made a "Magical Manor" embossing the stamping with Ranger's Copper Embossing Powder, and using up some old alpha stickers to spell MANOR.


     Most of the manor pieces were stamped with Prima Marketing's Old Town Stamp, and colored with Distress Ink Spray Stains. The roof was done with Wilted Violet, and Blueprint Sketch Sprays, while the wood was stamped and colored with Antique Linen, Hickory Smoke, Vintage Photo, and Walnut Stain Distress Ink Sprays. Then I added Purple Stickles to the skull, embossed again with copper using an old stamp.


     The walls were coated with Prima Marketing's Heavy White Gesso before coloring with sprays. Then I finished the edges with Wilted Violet Distress Ink and Bo Bunny's Stitches Stamp.


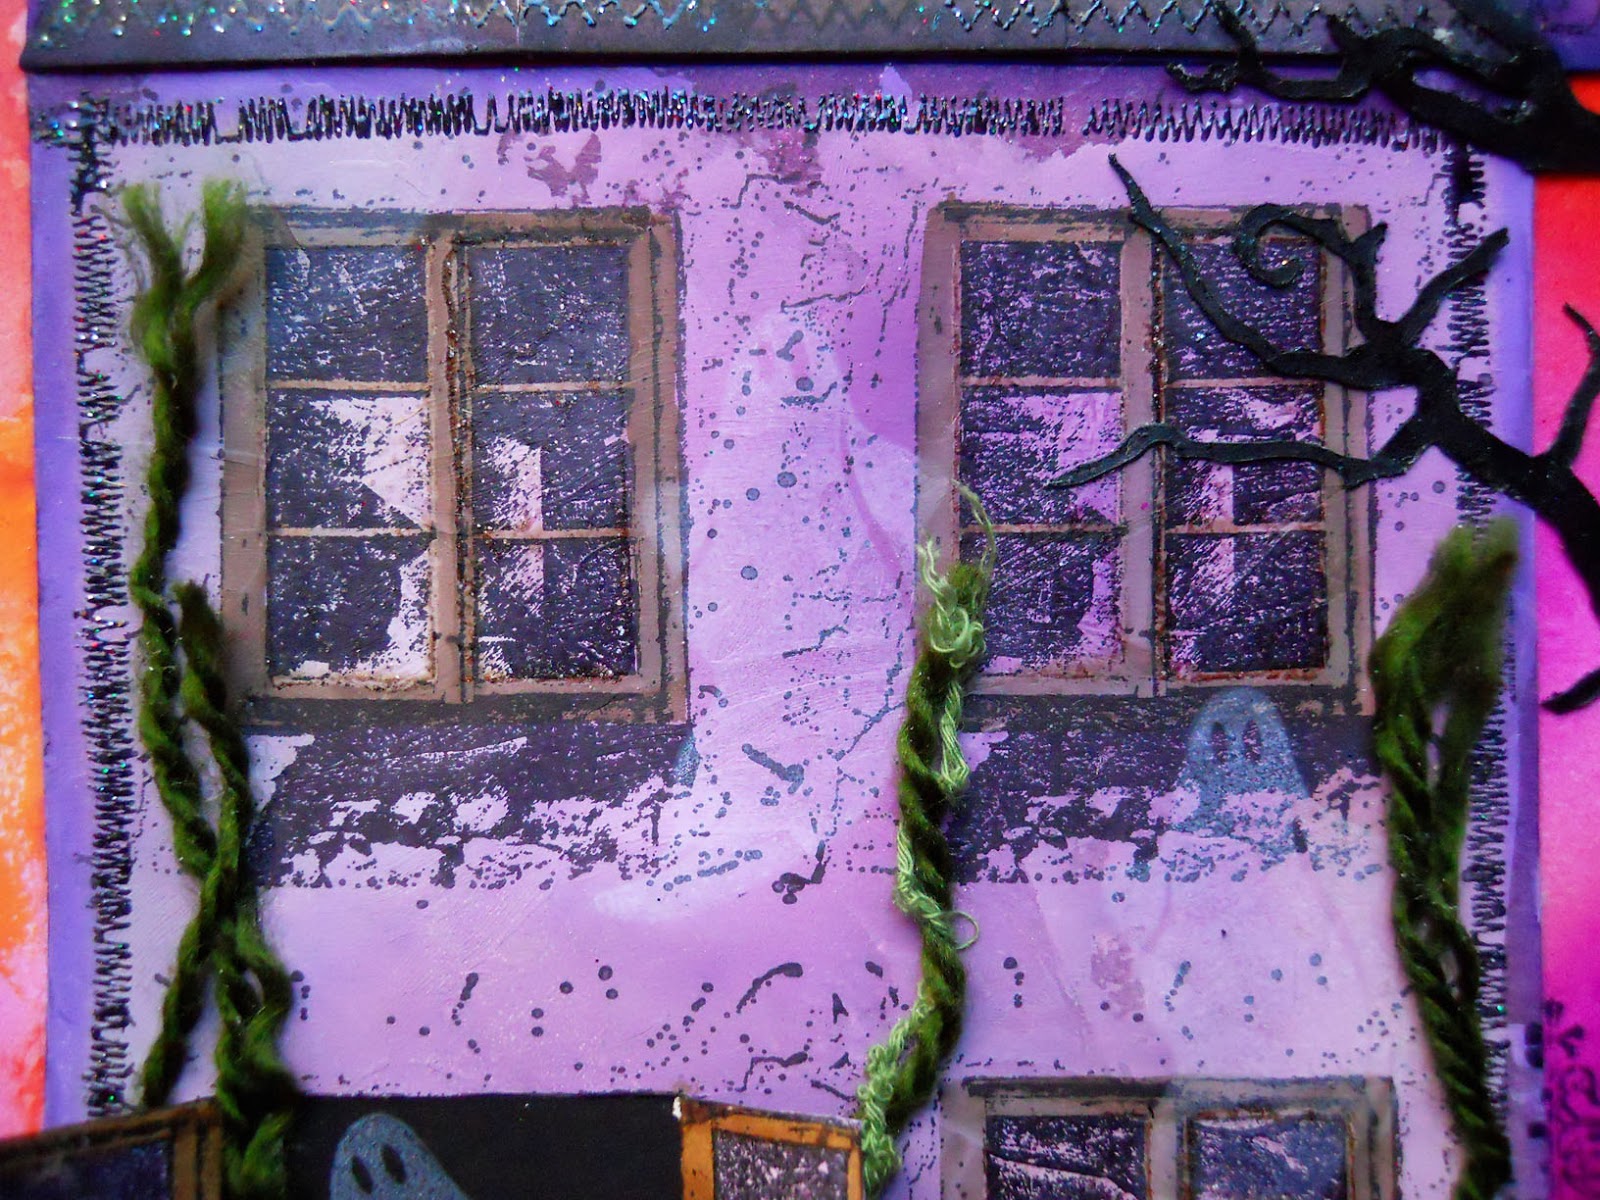
       Watch out for the ghosts that I hid inside some of the windows, stamped with Picket Fence Distress Ink!


     Happy Halloween! 


Thursday, October 26, 2017

Bo Bunny Serendipity 2 Pager

     Drea here with the Design Team, and I'm back with another project using Bo Bunny's Serendipity Collection from FotoBella.com.


     These beautiful photos of my sister and nephew were taken by my talented cousin, photographybyreginamarie. The quote and colors inspired this 2 pager, based on the sketch found here.


     I fussy-cut one of the photos, so I could place them in front of the door, (inked with Gathered Twigs Distress Ink) cut from a sheet of paper found in the Ephemera.


     For some sparkle, I applied Bo Bunny's Wasabi Glitter Paste to the green flower, (found in the Ephemera), and along the punched border. Then I added the circle Chipboard piece to the center.


     Before attaching the punched border, I used it as a stencil over the dark blue paper with Glitter Paste, to shine with the Bo Bunny Double Dot Blue Hues Flourish Jewels.


     The wooden shutters were cut from the same sheet of paper that I cut the door from, and inked along the edges with Walnut Stain Distress Ink. Then I creased the centers, using them to frame the large 8 X 10 photo.


     Always getting so much in the Ephemera, were these green laces. I love how they look with the distressed paper edges, (made easy with the Tim Holtz Paper Distresser)  and the machine-stitching!


     Thanks for looking, and shop for everything Bo Bunny at FotoBella.com!


Tuesday, October 24, 2017

Winter Wishes Double Layout

Welcome!  
Jessica here, and today I am sharing a double page layout I did using the Winter Wishes Bo Bunny line. 


This line is so much fun to use for those winter snow play layouts.  I just love the small pops of color the line offers with in it.  The snowflakes and trees are so whimsical and pretty.  The embellishments in this line make for a great amount of layering.


Hope you enjoy!  Thanks for stopping by.

Head over to www.FotoBella.com to get your own Bo Bunny Winter Wishes Collection!

Thursday, October 19, 2017

Bo Bunny Winter Wishes Tags

Hi! It's Jessica again!

When I saw this line I knew they would make the cutest little tags.  


I used the Winter Wishes Bo Bunny line. 

I created a layout of distressing on the edge of the tags.  I then used silver embossing powder on the chipboard snowflakes.   I also used something similar to the liquid pearl around the trees.  


It is a little hard to see in the pictures. I used some fibers and ribbon in my stash but FotoBella offers several similar selections in the store to select from. 


Thanks for looking!

Jessica

Wednesday, October 11, 2017

Winter Wishes Mini

Hi everyone, Jessica here!

Today I'm sharing a small mini album I created using the Winter Wishes Bo Bunny line.  


It's finished size is 6x6 in size.  There is enough room for 3x4 photos inside.  It was really simple to make and lots of fun. 


Thanks for looking! 

Head over to www.FotoBella.com to see this full collection.


Jessica

Saturday, October 7, 2017

World Card Making Day

Are you as excited as we are to celebrate World Card Making Day!?

The talented FotoBella Design Team has crafted some very inspiring Cards for you.


Here is designer Jessica's Card.
She used the BoBunny Winter Wishes Collection


Here is designer Jeri's Card.
She used 49 and Market Cottage Life papers, the Prima Marketing Princess Stella Stamp, Prima Flowers and even added some real dried mini roses.


Here is designer Drea's card.


Here is designer Apryl's Card.

Along with the cut file is from SVG Cuts Boho Butterflies Kit  http://svgcuts.com/index.php?main_page=product_info&cPath=53&products_id=410


We hope you are inspired to create a unique card today. Visit us at www.FotoBella.com to see products from your favorite craft brands.


Friday, October 6, 2017

Bo Bunny Pink Violin Layout

Hello!  
Jessica here, with the FotoBella Design Team

When I saw the pink violin's in the Winter Wishes Bo Bunny line I knew I had to do a layout of my daughter at her winter concert.  She was so excited she got to use the pink violin.


This line is so pretty.  It makes you want to create really beautiful layouts with it.  I used a little sparkle on the centers of the large paper and around the violin to make it pop a little.  I used something similar to this liquid pearl.


Thanks for looking!  I hope you enjoy.

www.FotoBella.com


Tuesday, October 3, 2017

Bo Bunny Winter Wishes Layout

Hello!  Jessica here with you today sharing a layout I did using the Winter Wishes Bo Bunny line.  
I love all the snowflakes and trees in this line.  Perfect for the winter pictures you have laying around.


I was having a little trouble photographing this layout because everything was coming out so blue.  But it is really more of a grey color. The pop's of pink are really pretty also.  They look great with the grey hues.


Thanks for stopping by and looking. 
Make sure you head over to FotoBella.com to see all of the new and festive winter products!

Jessica