Shop FotoBella

Shop for Scrapbooking Supplies by Product Type Shop for Scrapbooking Supplies by Brand Shop for Scrapbooking Supplies by Layout Theme Shop for Scrapbooking Supplies by Color

Search This Blog

Monday, February 27, 2017

Carta Bella Flora no. 1 Awning Tutorial

     Drea here with the FotoBella Design Team, featuring this adorable striped awning made with the Carta Bella Flora no.1 12 X 12 Collection Kit from FotoBella!


                   Supplies:                                                                     Tools:

                  * Carta Bella Flora no, 1 12 X 12 Collection Kit          * Scissors
                  * "Peeled Paint" Distress Ink                                        * Pencil and Eraser
                                                                                                     * Blending Tool

1. Use pencil to lightly draw a line 2 1/2" from the top of the striped "Rose Garden Bouquet" paper. Draw half circles a half inch below line using a 1 1/4" circle stencil along every white and green stripe.


2. Cut scallops out with scissors.


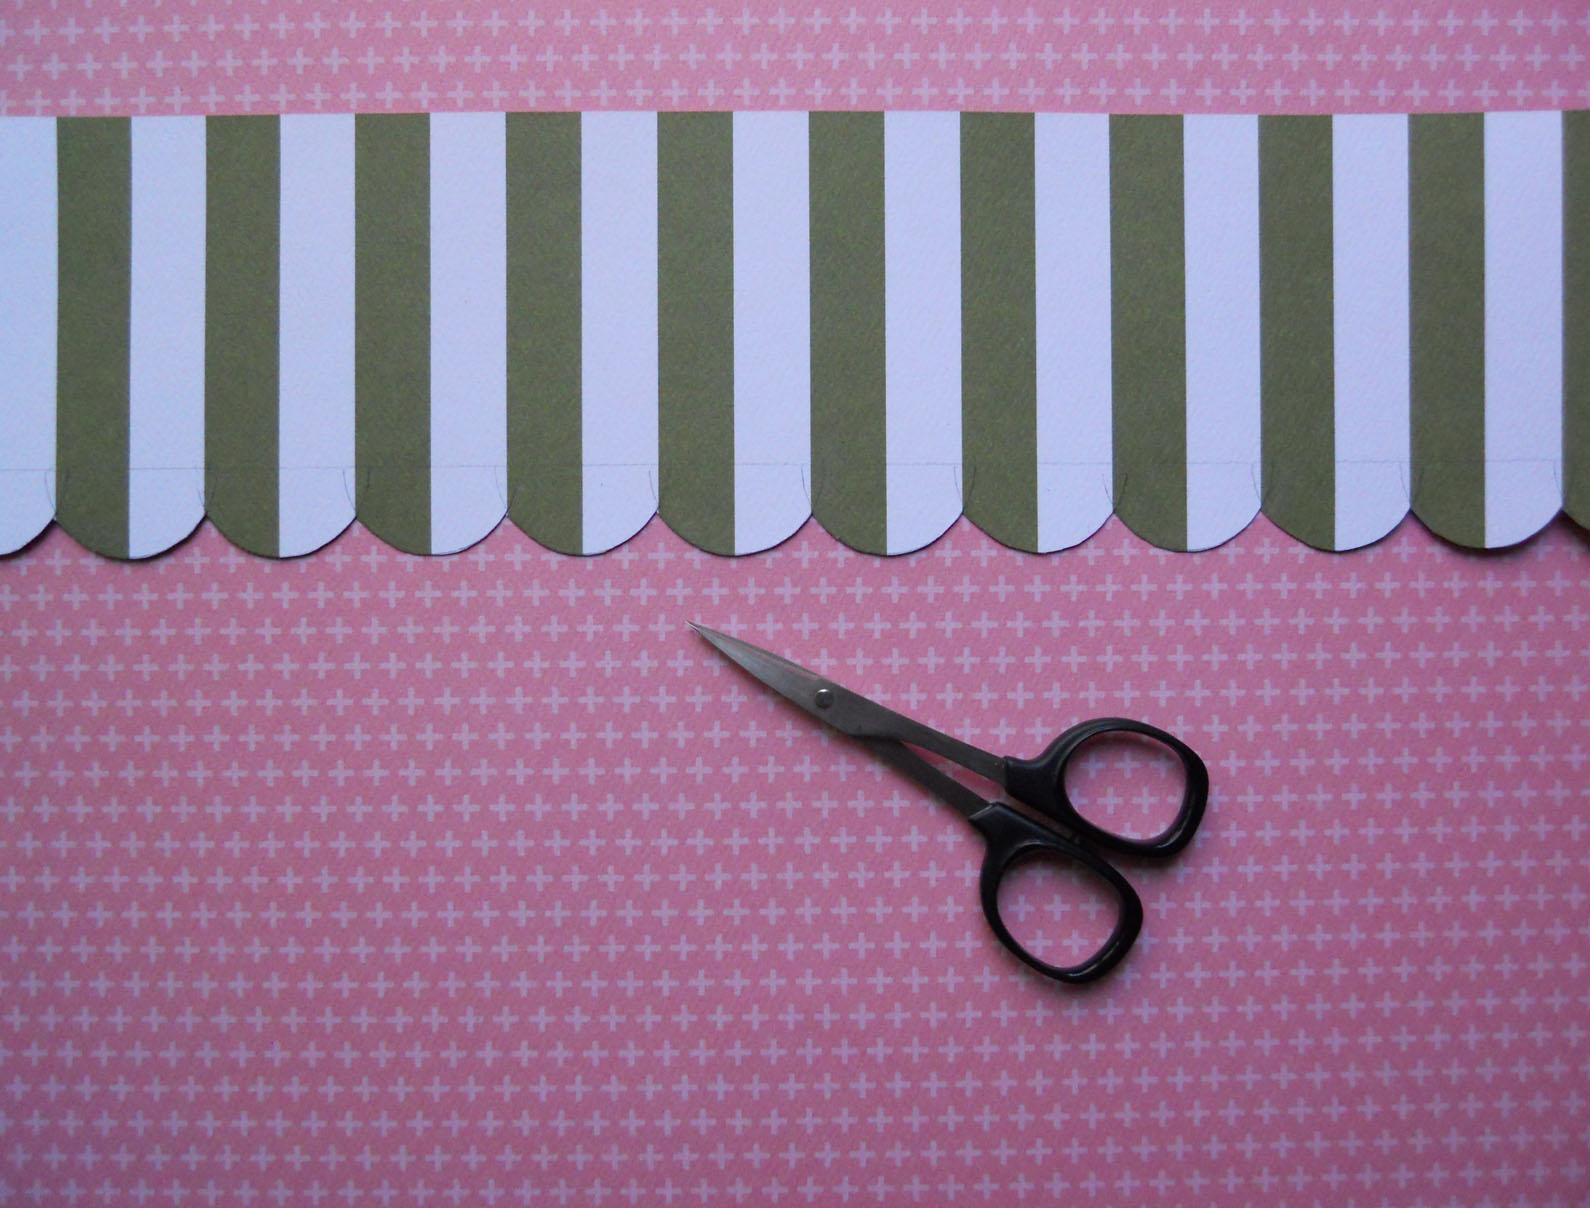
3. Fold and crease at the pencil line, erasing your lines afterwards.


4. Use Blending Tool to apply "Peeled Paint" Distress Ink around the edges. 


5. Cut 1/2" from sides of the back of the "Rose Garden Bouquet" paper, and punch along the bottom. Cut rectangle from middle of the "Petunia Patch Bundle" paper, and fussy-cut some flowers from the back. Glue punched paper about 2" down onto the rest of the "Petunia Patch Bundle" paper.


6.  Attach two 4" X 6" photos and journaling card onto your page.


7. Use alpha stickers to spell your title onto the awning. Run a line of tape runner onto the top back of awning, and pop dots along the bottom of the creased line. Then scatter curled and fussy-cut flowers onto the awning and rest of your page.


8. Finally, fill out journaling card with black pen, and use stickers for the date. 


Thanks for looking, and shop FotoBella to get these supplies and more! 


Friday, February 24, 2017

Carta Bella Flora no. 1 Thank You Cards

     It's always a great idea to have some extra Thank You cards on hand, as you never know when you may need one! Drea here with the FotoBella Design Team, sharing a couple that I made with Carta Bella's Flora no. 1 12 X 12 Collection Kit, Ephemera, and Petaloo's Mixed Blossoms.


     The extra heavyweight papers were perfect for distressing with the Tim Holtz Paper Distresser, yet light and sturdy enough for my sewing machine! I used the Thank You sticker from the kit, adding some Petaloo Mixed Blossoms, which look like they popped right off of the papers. 


     The strips of lace came from my own stash, which I lightly glued down before stitching!


      I popped up the dies from the Ephemera, using Seedless Preserves Distress Ink around the edges of this one.


Thank YOU for looking, and shop FotoBella.com for all these supplies and more!


Friday, February 17, 2017

Random Act of Kindness and Simple Stories Love and Adore

Hello all!  Apryl with the Design Team with you today to share my latest project with Simple Stories Love and Adore collection.  This project is in honor of Random Act of Kindness week.  It just takes a small act of kindness to make someone's day, make them smile, or to alter their path in a better direction.  Really it doesn't take much time or effort to be kind.  I always tell my kids, "it takes more energy to be mean that it does to be nice".  What simple things would make your day?  For me, it's a cup of coffee.

I love coffee.  I really do and just a simple cup of coffee could put a smile on my face.


I made this custom coffee cup sleeve with cute embellishments from the Love and Adore collection.


Here's a close up.  Don't you love that little heart <3.  It's a great decor piece for my coffee bar and makes me smile even more.

If you're out today, buy a suspended cup of coffee for someone who'll need it later to warm up.  If you haven't heard of this, a suspended cup of coffee gives a homeless person a hot cup of coffee if they need it.  They can go into a coffee shop and ask for it, no questions asked and it may just be what they need to get them through that day.  And it doesn't just work for coffee.  You can do it at sandwich shop or any food establishment that supports such acts of kindness.  

Have a great day!


Tuesday, February 14, 2017

P.S. I love you card with Simple Stories Love and Adore

Ok, so it's Valentine's Day!!  Happy, happy valen....oh my did you forget to get that special someone a card?  Hurry, dash and grab your Simple Stories Love and Adore collection because I've got the cutest and fastest card tutorial that will save you in no time!  


Step 1:  Select the "P.S I Love You" paper and cut a piece 12"x5" for the base of the card.


Step 2:  Fold the card in half, creating a top folding card that will be 5" wide and 6" tall.


Step 3:  Select the "P.S" I love you" journal card and cut out so that it can be matted on to the "So Happy Together" paper.  


Step 4: Before you matte the journal card, ink the edges with a mint green color.  I used the Tahiti powder puff ink.


Step 6: Once inked, adhere to the matting paper using adhesive.


Step 7: Adhere the matted journal card to the base of the card, towards the bottom and slightly farther to the right side of the card.


Step 8:  Select the black and white striped heart from the journal cards and fussy cut it out. 


Step 9:  Tuck the heart behind P.S I Love You journal card at the top left hand corner and add the "Hello Love" word strip from the "Bits and Pieces" packet and layer over the top of the journal card. 


Step 10:  Select the dark pink flower from the "Bits and Pieces" packet and layer it on the bottom right hand corner of the journal card.


Step 11:  Select the pink striped heart from the Bits and pieces and tuck it in next to the black and white striped heart at the top of the card.  


Step 12:  Select the pink ticket that says "FEB 14" on it and tuck it under the journal card vertically.  


Step 13:  Add a staple to the pink ticket and the "hello love" word strip.


Step 14:  Select some twine from your crafty stash, and wrap it around the card several times.  


You're finished!  That's a great lookin' card you got there!  I bet you have the perfect person for it :)  Enjoy your Valentine's Day with a little crafting and possibly shopping at FotoBella.com!  And if you don't have the Simple Stories Love and Adore collection, now is a good time as any to check it out!

Have a great day!


Thursday, February 9, 2017

Happy Mail with Simple Stories Love & Adore

Wouldn't you know it's February already and with Valentine's Day right around the corner!?! Simple Stories Love & Adore collection can be found at FotoBella.com and is just the right collection to inspire some "love"ly crafts!  Apryl here with you today, FotoBella design team member, and I've got a cute project for you.


I've got a confession, every year around this time, the dollar spot at Target has these cute little tin mailboxes, and every year I buy some....and this is year I finally use them in a project!  I'm sure many of you can relate :)  For this project I'm using the Simple Stories Love & Adore collection to embellish a turquoise and white mailbox.

This is really a fast and easy project and just so cute!  Perfect for the kiddos to take to school for their Valentine exchange or to tuck a few Valentine goodies of your own to give as gifts.


To start, I cut a piece of "So Happy Together" paper and "Elements" Paper that measures 12"x4" so that it would wrap around the body of the mailbox.  It really fits perfectly, but one thing worth mentioning is that you do have to cut a notch out so that the flag on the mailbox is not covered up and moves properly.


For the embellishments, I sorted through the Card Stock Die Cut Ephemera Bits and Pieces. The sizes of these pieces are just right for this project and there are lots of pieces to choose from.  I layered them up and added a few enamel dots and some twine.  It really is that simple, but that's what make working with Simple Stories products so awesome :)  Find them here at FotoBella.com


So happy to share my first design team project for the year with you!  Looking forward to many more!


Monday, February 6, 2017

Valentine Card & Envelope

Hi all, it's Jeri here with the FotoBella Design Team.

Today I have a quick and easy Valentine Card & Envelope tutorial for you.


Decide how big you want you envelope to be and cut the paper down to the specified size. I chose a 3x4 envelope.


Follow the instructions on the punch board.
Once you have it punched, add some adhesive to the sides and secure them to the folded up envelope bottom.


Next, grab some White Cardstock and your BoBunny Ruby Red Glitter Paste. With a brush smear some of the paste around, in a 2x2 area. Set aside and let dry.


Once that is dry cut a heart out of it.


Decorate the front of the envelop with a strip of the Black & White stripe paper from your PhotoPlay Collection, and this heart sticker from the Sticker Sheet. Top it off with the glitter heart.


Now to make the perfect size card to fit in the envelope. Cut a 3x4 piece of black cardstock.


Cut a strip of the red heart vine print and secure to the left side of the card. Cut off the excess.


Grab a heart sticker and the Happy Valentine's Sticker from the sticker sheet and stick to the front of the card.


Your card and envelope are now done!
Find a white or metallic marker to write a note on the back of the card and you are ready to give it to someone you care about!


Thanks for stopping by!
You can grab all of these products at FotoBella.com


Friday, February 3, 2017

Go Red For Women

     Are you wearing red today? Drea here from the FotoBella Design Team, with another page in my art journal honoring women for National Wear Red Day, which falls on the first Friday of February every year since 2003. Heart disease and stroke cause 1 in 3 deaths among women each year, killing approximately one woman every 80 seconds. Fortunately those numbers can change, because 80 percent of cardiac and stroke events may be prevented with education and action. So make your heart a priority, and encourage the females in your life to do the same!


     For this page, I knew I wanted to use Dylusions Paints, for the vivid and intense colors that I love so much!  So I used a baby wipe to blend Postbox Red, Cherry Pie, and Pomegranate Seed along the top, leaving a white space for the heart. After placing some very old black alpha stickers, I used the Tim Holtz Dot Fade Stencil with a Blending Tool to emboss gold dots with Rangers Gold Tinsel Embossing Powder, giving the illusion of twinkling lights.


     The heart was cut with my Cricut Expression from white cardstock, and stamped with the Prima Marketing Garden Fable Stamp using Ranger's Jet Black Archival Ink. Since the ink is permanent, I was able to mask RED with my old Ranger Alphabet Mask, and not have any bleeding after spraying it with Candied Apple Distress Spray Stain.  Then I finished the edges with more gold embossing.


     The really fun part was using my Julie Nutting Lorena Doll Stamp to create this fabulous dress painted with the same Dylusions Paints that I used on the background. I also embossed the dress and headband with the same gold embossing powder. Her skin was colored with a marker, with some mist on her cheeks, and her hair colored with Fossilized Amber and Vintage Photo Distress Spray Stains.


     Then I ruffled some sheer ribbon along the bottom of her dress, and created a shawl with the ribbon symbol. For my final touch, I made her some gold heart earrings, embossed with Bo Bunny's Stitches Stamp. 


     Thanks for looking, and shop FotoBella by color for all of your Red needs!