Shop FotoBella

Shop for Scrapbooking Supplies by Product Type Shop for Scrapbooking Supplies by Brand Shop for Scrapbooking Supplies by Layout Theme Shop for Scrapbooking Supplies by Color

Search This Blog

Wednesday, February 27, 2019

Easter Eggs Everywhere - BoBunny (Cottontail)

Hello FotoBella Fans,
It's Karen here today to share my final post for the FotoBella Design Team. I have been extremely blessed to be trusted to create inspiring projects to share with you.  Again, I am using the beautiful BoBunny - Cottontail Collection. I think you will love the abundance of eggs and vintage bunny images. Be prepared to enjoy the splendor of spring and all the glorious pastel colors. You can visit me anytime at my blog, Art & Soul. Come by and say hello. Happy Crafting!


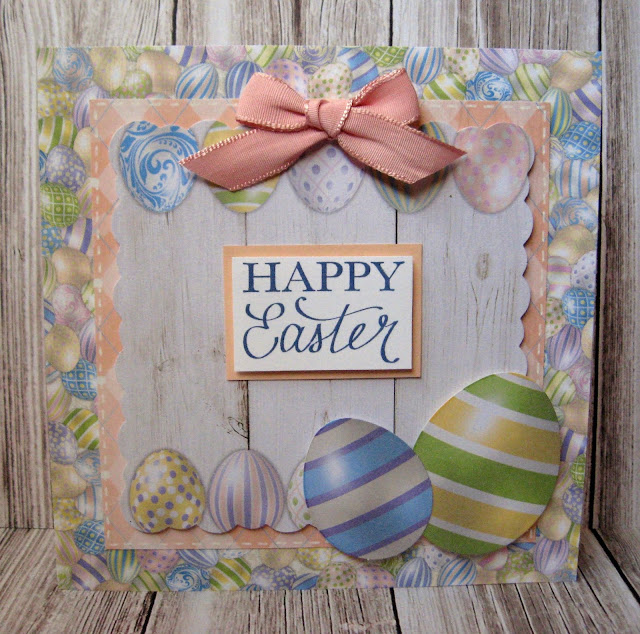
Faux stitching details were added with a white gel pen around the edge of the matte.


FotoBella Supplies:
BoBunny Cottontail Collection Pack 12x12
BoBunny Cottontail Bonus 12x12 Paper Bundle
BoBunny Cottontail 12x12 Coordinating Double Dot Paper Bundle
BoBunny Cottontail 6x6 Pad
BoBunny Cottontail Layered Chipboard 6 Pieces
BoBunny Cottontail Noteworthy 28 Pieces
BoBunny Cottontail Double Dot Think Pink Brads
BoBunny Cottontail I Want It All Collection

Other Supplies:

white gel pen, sentiment stamp, ink pad, ribbon, foam tape


To see more projects by our Designer Karen visit her blog, Art & Soul.

Sunday, February 24, 2019

KaiserCraft Misty Mountains Birthday Card

     Hello! Drea here with a quick birthday card that I made using the KaiserCraft Misty Mountains Scrapbooking Bundle from FotoBella.com! I received this bundle last spring, but the colors were perfect for February's birthstone, amethyst, which I just printed and cut out.


     To give it lots of sparkle, I used some glitter embossing powders along the paper edges, and adhered Prima Marketing Glass Glitter (Pearl) to the torn edges using Ranger's Glossy Accents.


     I also added the moon rhinestone from my own stash.


     Thanks for looking, and get the KaiserCraft Misty Mountains Scrapbooking Bundle at FotoBella.com!


Thursday, February 21, 2019

Spring Cards with Embossing- BoBunny (Cottontail)

Hello Crafty Friends,
It's Karen...I'm here to share my second project of the month featuring the BoBunny Cottontail Collection. I love embossed textures and this is the first time I used an embossing folder over pattern paper. I selected papers with very small discreet patterns to try this technique. I love how the subtle texture brings extra life and dimension to the cards. Let's get going and I'll show you how I created these quick cards with extra embossed pizazz.
Notice the subtle embossed butterflies on the yellow pattern background paper.
 

Notice the subtle embossed flowers on the upper right quadrant of the background paper.
 

Notice the row of embossed tulips along the bottom edge of the card.

FotoBella Supplies:

BoBunny Cottontail Collection Pack 12x12
BoBunny Cottontail Bonus 12x12 Paper Bundle
BoBunny Cottontail 12x12 Coordinating Double Dot Paper Bundle
BoBunny Cottontail 6x6 Pad
BoBunny Cottontail Layered Chipboard 6 Pieces
BoBunny Cottontail Noteworthy 28 Pieces
BoBunny Cottontail Double Dot Think Pink Brads
BoBunny Cottontail I Want It All Collection

Other Supplies:
  • card base (6x6"), 3D foam tape, embossing folder, die cutting/embossing machine, leaf vine die, alphabet stickers / sentiment, ribbon
Directions:
1.  Select a single sheet with a small discreet pattern (Cottontail 6x6" paper pad) which will create the background. 
2. Position the embossing folder over the paper and run it through the embossing machine.
 

3. Tie a faux bow around a 7" length of ribbon.  Attach it along the lower edge of the paper and fold the ends to the backside.  Adhere the background paper to the card base leaving a narrow border.

4. Select a main embellishment and matte with coordinating background paper.  Fussy cut around it leaving a thin border.  Then attach it with foam tape slightly overhanging the top edge of the card.


5. Cut out leaf vines from green pattern paper. Attach them slightly peeking out from behind the main embellishment.  Adhere the leaves and add a sentiment.
Thanks for stopping by!


To see more projects by our Designer Karen visit her blog, Art & Soul.

Wednesday, February 20, 2019

Graphic 45 (Flutter) Cards

     Hey everyone! Drea here with a step-by-step tutorial for this card set, featuring the colorful and beautiful Graphic 45 (Flutter) I REALLY Want It All Bundle from FotoBella.com!


     ***********************************
                   
                                          Supplies:                                         Tools:

*Graphic 45 (Flutter) I REALLY Want It All Bundle            *Heat Gun for embossed sentiment
*Glue
*Assorted Ribbons 
*Sentiment Stamps (Optional)


Directions:

1. Cut and fold card bases from the Flutter Coordinating Card Stock to measure 6 1/2" X 4 1/2".


2. Glue the larger cards from the Ephemera to the card bases. 


3. Adhere postage stamp Stickers at an angle along the sides and/or corners. 


4. Tie and knot two coordinating ribbons (not included in the bundle) to a Chipboard piece, and glue to Ephemera cards as shown.


5. Finally, stamp and emboss a sentiment.


          Thanks for your visit, and get the Graphic 45 (Flutter) I REALLY Want It All Bundle at FotoBella.com


Tuesday, February 19, 2019

2019 FotoBella Design Team Call


FotoBella is having a design team call!  

What we are looking for:
  • ·         3 Inspirational and Unique Designers
  • ·         Crafters that will commit to a 6 month term from April 1, 2019 through August 31, 2019
  • ·         Experts in Scrapbooking, Card Making and Mixed Media Projects
  • ·         We require 3 projects per month
  • ·         1 project each month will be a full tutorial with clear photos and links to all FotoBella products used
  • ·         High quality photos of all projects for our blog and social media
  • ·         You will be required to share not only your projects on your social media, but share some of the other team member’s projects as well.
  • ·         We also ask that you like, comment and share various FotoBella project posts, sale posts and product posts.


Benefits for you:
  • ·         You will receive 1 fully loaded Design Team Kit each month
  • ·         You will be featured in our social media posts and on our blog
  • ·         The perfect reason to sit down and craft your stresses away!


How To Apply:
·         Email both [email protected] and [email protected] with the following:
o    Subject line: FotoBella 2019 Design Team Call
o    Full Name and Address
o    A short bio
o    Links to your Social Media
o    4-5 images of projects you have crafted, with a small description
o    If you have been on any other design teams, and which ones

Application Entry will close March 1, 2019.
Due to shipping and time constraints, this call is to US based applicants only.


Sunday, February 17, 2019

Rain Art Journal Page

     Hello FotoBella Fans! Drea here with an art journal page featuring this fabulous silhouette that  I found online, and looking very familiar! Lol!


     The background was colored with Lindy's Gang Magical Shakers, after using a plastic fork with Prima Marketing White Gesso to create rain. Then I applied some Prima Marketing Metallique Wax (Old Silver) over the rain, followed with a coat of Silver Stickles, for some more sparkle. The large star was made with Bo Bunny Silver Stencil Paste, using an old chipboard cutout as a stencil. It also got a coat of Silver Stickles.


     The other stars came from an older Bo Bunny Bundle (Forever Young), embossed with Ranger's (Rainbow Sparkle) Embossing Powder. Then I used an older Tim Holtz stamp with the filmstrips, embossed onto clear transparency paper, and adhered with Glossy Accents.


     I also used clear transparency paper to print the umbrella, and embossed it in copper. Then I hung stars from it with the Bo Bunny Oh My Stars Stickable Stencil using Bo Bunny Gold Stencil Paste, also applied with a plastic fork underneath to create more rain, and coated with Golden Rod Stickles.


     The image was fussy-cut, embossed in black, and also got the fork technique. Then I made a cape for her with a recycled fruit bag, that I also coated with Stickles.


     The quote was stamped and embossed, and was my inspiration for this page!


     Finally, I used some Prima Marketing brick and fence stamps along the bottom, also embossed.


     Thanks for looking, and take a peek at all of the New Goodies arriving at FotoBella.com!


Thursday, February 14, 2019

Vintage Easter Bunny Cards - BoBunny (Cottontail)

Hello Friends,
It's Karen...I'm here to share my first project of the month featuring the BoBunny Cottontail Collection.   Everything coordinates so perfectly that it is so easy to make quick cards using this kit. Your friends will think you spent hours on these. I really love how the chipboard embellishments have lime green glitter to accent the edges.  The papers and die cuts are so beautifully colored.  Look at the details in the bunny's fur.  Doesn't the bunny look velvety soft?  I have three cards to share with you featuring this beautiful bunny image.


FotoBella Supplies:
BoBunny Cottontail Collection Pack 12x12
BoBunny Cottontail Bonus 12x12 Paper Bundle
BoBunny Cottontail 12x12 Coordinating Double Dot Paper Bundle
BoBunny Cottontail 6x6 Pad
BoBunny Cottontail Layered Chipboard 6 Pieces
BoBunny Cottontail Noteworthy 28 Pieces
BoBunny Cottontail Double Dot Think Pink Brads
BoBunny Cottontail I Want It All Collection

Other Supplies: card base (6x6" & 5x7"), 3D foam tape, ribbon, liquid adhesive, alphabet stickers, flower


To see more projects by our Designer Karen visit her blog, Art & Soul.