


Hello,
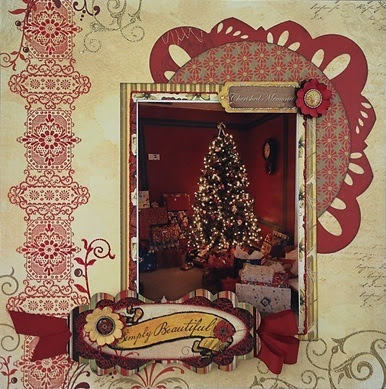
This is Apryl with Fotobella Design Team. Today I am sharing with you step-by-step how to re-create this layout:

This layout was made with the BEAUTIFUL Bo Bunny Serenade-I Want It All Collection found at fotobella.com.
|
Supplies:
·
Paper: Cutouts (Side B), Dragonfly (Side
B), Stripe (Side B), Garden (Side B), Poppies
·
Combo Sticker Sheet, Brads, Petals
·
Xmas
Red Stickles
·
Gold
Stickles
·
Pop
Dots
·
Dark
Red Ribbon
·
Black
Ink
|
Photo Sizes:
Tools:
·
Lucky 8 Classic Wreath Punch
·
Circle Cutter
·
Stapler
·
Paper Trimmer
·
Paper Piercer
|
1.
Select BoBunny Serenade Collection.
  |

4. Trim the paper down to 9”x9”.

5. Using the Lucky 8 punch Classic Wreath. Set the cut settings to “on” for the
Outer Cut and the Inner Cut.
|

6. With the red
side of the paper facing up, begin punching all four corners.
|


9. Ink the edges
of the shape with black ink.
   |

12. Matte your photo
in white cardstock, matte with Poppies paper and then matte a third time
with Garden Paper Side B. Place the
photo on top of the Circle as shown.

13. Select a dark
red ribbon and gather three loops together.
Use a staple to secure the loops at the base (where my thumb is holding
the ribbon). Do not cut the ribbon
tails.

15. Using pop dots, adhere the Simply Beautiful Sticker to the bottom left hand corner of your matted photo.
16. Select a small red and yellow flower, layer and attach with a brad. Using a glue dot, adhere the flower embellishment so that it covers the small red flower to the left of the word “simply” on the sticker.
 |

17. Select the
sticker that says “Cherished Memories” from the 12x12 sticker sheet. Using pop dots adhere the sticker to the top
right had corner of the matted photo.
Select a small black and red flower, layer and secure with a brad.

18. Embellish the
layout with Xmas red and gold Stickles.

Hope you enjoy this beautiful layout you just made!
Have a very Happy Holiday!

No comments:
Post a Comment