


Make sure to scroll all the way to the end to see her awesome Tea Stained Muslin Card tutorial.


The Sweetest Thing
Bundle
Tea Stained Muslin
Card
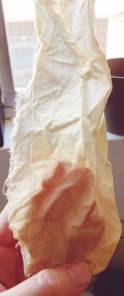
Find some left over,
random or used cotton muslin. I had a roll left over from pattern making in
college. It’s so versatile for projects like this.
Brew some tea,
crumple up the strip of fabric and put in the tea. I cut a strip of fabric
about 3 feet long. I used something to weigh it down. Let soak for a couple
hours, or check it to see when color is how you’d like it. Then ring out and
hang to dry. Keep the creases and wrinkles. do not flatten.
With some fabric
scissors, cut a round, petal design.

With the Copic PerfectPrimaries Set of 6 Sketch markers, I used the light blue and the dark yellow.
Using the side of the marker, just lightly rub over the flower petals. The ink
should hit the wrinkle parts and be random. You can use just one color, or
more, if you choose.

With a needle and
thread, on the straight side of the fabric, weave in and out. This makes it
easier to scrunch the fabric. Make sure to tie knots at the end of the thread.

Once
you get to the end of the fabric strip, you can start scrunching the fabric
tight as you’d like. It will round, and practically form the flower itself. Roll it around so you either have 2 or 3
layers of petals for the flower. Once
you cinch it tight as you can, tie a knot in the thread. I used
some Loctite in the center of the flower to make sure it all stuck. You can use
hot glue or anything you’d like.

This is what the
flower should look like once it’s set.

I used a button
sticker and some chipboard details for the center of the flower. I also glued a
peacock color bead from my own collection in the center.

Now, on to the card!
I found a large
chipboard from my own collection that I loved. I use this as a template for the
shape of the card. Then also used it for
a smaller layer in the turquoise dot paper in the image.

Cut that out. Grab
the adorable stamps from the bundle, and put some flowers around the edges, as
they will only be seen from under the flower. Let this dry while you work on
the back of the card.

Use the large
chipboard again for another layer. It just needs to be a half of the card. Glue
this paper piece down on the right side, and glue the chipboard down on the
left side.

I cut a piece of
turquoise dot paper out, stamped it and glued it center on the right side. I
added some chipboard designs from my collection, along with a button from this
bundle and some other décor I had.


This will complete
the back of the card. Turn the card back around to the front. Glue the
turquoise dot piece, centered. Then use loctite or hot glue to secure the
muslin flower in the center of the turquoise paper.
And it’s done!

Jeri-
ReplyDeleteI really love all of these projects... And a wonderful tut. I will need to try this one.
Thanks for sharing your talents.
Sarinda x
Thank you Sarinda, you are awesome!! I had so much fun with the muslin and the card. That one accent changes the whole design!
Delete