Shop FotoBella

Shop for Scrapbooking Supplies by Product Type Shop for Scrapbooking Supplies by Brand Shop for Scrapbooking Supplies by Layout Theme Shop for Scrapbooking Supplies by Color

Search This Blog

Monday, April 29, 2019

Carta Bella Flower Market Flip Tab Book

Hello everyone. Today I am going to walk you through with how to make a flip album tag book. This flip tags are great for adding DIY embellishments too. I am actually getting this ready to send out to a crafty friend to bring her a happy mail smile.

Supplies Used:
Carta Bella Flower Market 12x12 Paper Pad
Carta Bella Flower Market 6x6 Paper Pad
Carta Bella Flower Market Chipboard Phrases
Carta Bella Flower Market Frames & Tags Ephemera
5 Base Tags
10 Pattered Paper Crafts
Glue
1" Album Ring


1.  Cut out your base tag and then the paper decorated to cover both sides. For this project I am using 5 base tags and 10 Pattered Papers cut out.  Glue down the pattered papers onto the base tags on both sides. Punch a Hole into the tags for the ring. 


2.  Next Start to layer and decorated the tag in whatever style you would like. For the example, I created a side pocket in order to add some cute DIY cards and embellishments to send out.


3.  The final step is to use a ring clip to add all the tags. I used a 1 inch album ring. 


4.  So Ta-Da here is a quick but adorable project and a great way to send a crafty project to a friend.


Thursday, April 25, 2019

PhotoPlay Here & There Stamped Cards


Hi all, it's Annie and today I'm back with a few more cards featuring the gorgeous stamps and dies from PhotoPlay's new Here & There Collection.


I'm a sucker for monarch butterflies, so I couldn't help but color up the beautiful images for this card in different shades of orange and red.


One of the fabulous surprises in this stamp set was a preprinted coloring card.  The images were dark and crisp and my Copic markers blended beautifully on the cardstock!  After coloring all of the images I was going to use on my cards, I stamped one of the sentiments on the preprinted banner, and then die cut everything out using the coordinating dies.


The butterflies were used to draw attention to my focal image - a sentiment from the cardstock sticker sheet in the collection surrounded by a frame from the ephemera pack.  I added a few additional butterfly stickers and a spray of paper mini blossoms around the image as well.


The background is created from some of the antique map cardstock from the collection, matted with a bit of Espresso Bean cardstock.  Before adhering the entire card front to a 5" x 7" card base, I added a little orange and lace ribbon from my stash and a chipboard sentiment.


For the second card, I wanted to emulate the look of a postcard, so I started by matting a piece of blue patterned cardstock with Ecru cardstock, followed by the striped patterned cardstock to create a 5" x 7" cardbase.


I popped the colored biplane image up with its sentiment banner in the lower right corner and balanced the card design with a banner popped up in the opposite corner made with elements from the ephemera pack.


For fun, I "stamped" the postcard with a chipboard stamp!

I hope you enjoyed these fun stamped travel cards and thanks so much for stopping by today.  Be sure to visit the FotoBella store and pick up this beautiful collection today!

Monday, April 22, 2019

Happy Earth Day!

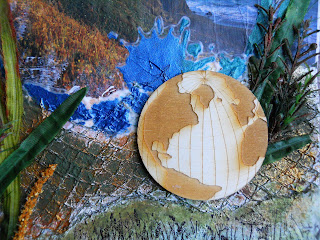
     Happy Earth Day! Drea here with an art journal page to celebrate our beautiful planet, made with an assortment of recycled items and some mixed media from FotoBella.com.


     I started by adhering a white napkin (opened up) to my page with Prima Marketing Soft Matte Gel. Then I added torn strips from an old dictionary, the magazine images (the tree and Pacific Ocean in Northern California), and netting leftover from some fruit, and coated it with Prima Marketing Gesso (Clear and White). The clear gesso was applied to the circle stencil, and painted with Prima Marketing Art Alchemy Paints (Deep Waters,Emerald Green, and Raven Black).


      Before adding some old stickers for the title, I painted the sky with Art Alchemy Sparks (Magical Pond).


     To blend the image with the background, I used a stipple brush with Prima Marketing Rust Pastes (Brown and Red), and (Dark Olive and Brown) from the Camouflage Set. Then I gave it some touches of Art Alchemy (Ginger Magic) Sparks Paint. I also used the pastes on the some of the plastic greenery, which along with the grass, has been in my stash for awhile, and feels good to use up. 


     The bottom part of my page was painted with Art Alchemy Paints (Fairy Wings and Green-Gold) before embossing with the Stamperia (Meadow) Stamp. Originally I was going to paint the globe from the Stamperia Wooden Frame (Around the World), but decided to keep it natural instead.


          Thanks for stopping by! 

Sunday, April 21, 2019

Simple Stories (Simple Vintage Traveler) 2 Pager

     Hello FotoBella fans! Drea here to show you how I used these ATC's from a previous post on this 2 pager, featuring the Simple Stories (Simple Vintage Traveler) Collection from FotoBella.com. If you missed it, just click here, for a step-by-step photo tutorial. 


     To make the ATC's stand out, I kept the other papers fairly simple with the Simple Stories (Simple Vintage Traveler) Simple Basics Kit, except for the dotted paper that comes in the Simple Stories (Simple Vintage Traveler) Collector's Essential Kit. The heart next to the Chipboard title, comes in the Collage Bits & Pieces, and was inked around the edges with Distress Ink (Stormy Sky), along with the dotted paper. 


     I also added some more Washi Tape, a couple of arrow stickers, and the other heart from the Bits and Pieces package. 


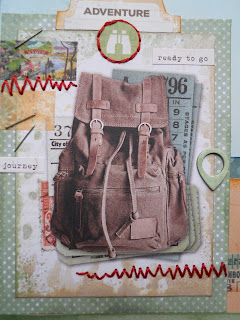
     Here's a close-up of one of the ATC's.


          Thanks for looking, and stop by FotoBella.com to get the Simple Stories (Simple Vintage Traveler) Collection!


Thursday, April 18, 2019

Carta Bella Flower Market Wall Decor

Welcome everyone. It is Olivia here and today I want to showcase a home décor item I created by repurposing an sign from the Dollar Tree.  For this project, the base is a chipboard plaque.  I used the Carta Bella Flower Market paper collection and matching embellishment sets for this project.


  I cover the board in strips to replicate a "plank" looked.  I used a corner rounder on the edges.  Next I created two rosettes.  The larger one is 6 inches and the smaller one is 5 inches.  I also added a tag in the background for some more layering on the project. 


 In order to make the 6 inch Rosette I cut two pieces of patterned paper at 12 inches long and 3 inches wide.  I then scored it every 1/2 inch an accordion folded the paper. Then you glue the two half together and you pushed down for your rosette. I used the Carta Bella Flower Market Chipboard and Carta Bella Flower Market Frames and Tags for the Rosette centers for the pieces and through the plague as well.  For the 5 inch size Rosette the paper dimensions are 2.5x12 and followed the steps above. 


I hope you all enjoyed this project and don't be afraid to decorate your home with some of your own wonderful creations. 


Monday, April 15, 2019

Handmade Travel Journal with PhotoPlay Here & There Collection


Hi again!  It's Annie and today I'm sharing a tutorial for a handmade travel journal made with PhotoPlay's new Here & There Collection.  You can use this fun book to keep your photos and memorabilia safe, record your thoughts, or even sketch during your journey.


Start by trimming two pieces of Café Ole cardstock to 9” x 11.5”.  Score each piece down the center.


Adhere the two pieces of cardstock together using a thin layer of liquid glue with the textured sides facing outward.  Fold the cardstock on the score lines and round the top and bottom right corners with a corner rounder.


To create your section dividers, trim two pieces of Ecru cardstock to 8.” X 11”, score both down the middle and round the right-hand corners.  Pages can be created using copy or sketch paper, trimmed/scored in the same way. (If you make a very thick journal, you may need to remove ¼” from the inner pages to keep them flush.)


Trim two pieces of luggage tag patterned paper to 8.5” x 5.25”, round the corners, and ink the edges with brown ink.  Line the inside of the cover with these panels using liquid glue.


Mat the luggage tag cardstock sticker and the ledger patterned paper with Espresso Bean cardstock and adhere to the inside of the front cover with liquid glue.


Trim out two more decorative panels from the patterned cardstock in the collection (3” x 4”), mat them with Espresso Bean cardstock, and adhere to the front cover as shown.  Arrange the Travel chipboardstickers on brown cardstock, fussycut around them with scissors to create a thin border, and adhere to the cover with liquid glue.


Decorate each section divider as desired.  Here I’ve chosen a quote panel from the patterned cardstock in the collection, binoculars sticker, and ticket from the ephemera pack, and matted each with brown cardstock.


The other two section dividers were embellished in a similar way.  To finish off the dividers, I inked the edges of each with brown ink. 


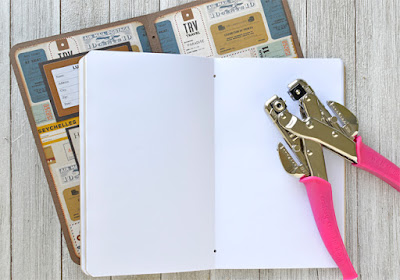
Using a hole puncher, punch small holes in the cover about 1” from the top and bottom.  Pages and section dividers will need to be punched 0.75” from the top and bottom to accommodate for the extra width of the cover.


Arrange your journal as desired and thread natural twine through both holes of the pages, section dividers, and cover so that the ends meet on the outside of the book.  Tie a sturdy knot and trim with scissors.


Enjoy your new handmade travel journal…add photos or memorabilia from your trip to the pages and record your thoughts or even use it as a sketchbook!


Don’t forget to fill out your luggage tag in case it gets lost…and you can use the ledger panel as a table of contents too.

I hope you enjoyed this fun handmade travel journal tutorial and thanks so much for stopping by today.  Be sure to visit the FotoBella store and pick up this beautiful collection today!

Saturday, April 13, 2019

Simple Stories (Simple Vintage Traveler) ATC's

     ATC's (Artist Trading Cards) aren't just for trading! Drea here with a set I made using the Simple Stories (Simple Vintage Traveler) Collection from FotoBella.com. Instead of trading them, I'll show you how to scrap with them in an upcoming post. But for now, grab your supplies, and follow along. 


             Supplies:

* Glue

Tools:

* Stapler
* Needle and Embroidery Threads (Optional)

**************************************
Directions:

1. Cut cards from the 3 X 4 Elements paper that comes in the Simple Stories (Simple Vintage Traveler) Collector's Essential Kit, and smoosh Distress Inks along the edges. I used two colors per card, except for two, where I only used one (Ground Espresso) for the darker cards. But any combination of colors listed in the supplies will work. 


2. From the 6 X 8 Pad, cut papers at 3 1/2" X 4 1/2". Match a Distress Ink color, to also smoosh along the edges.


3. Adhere cards from step 1 to the cards in step 2.


4. Use scrap papers from the 6 X 8 Pad to matte the Sticker word tabs, ink edges with Distress Inks, and adhere to the top center of the 2 X 3 cards.


5. Add a couple of strips of Washi Tape to each card.


6. Use stapler a few times on the Washi Tape strips.


7. Attach circle Stickers to the bottom centers of the tabs.


8. Hand-stitch around circles, and add a couple of rows of zigzag stitching to cards. You could also doodle or stamp your stitching if you're not comfortable with sewing. 


9. Add a couple of word Stickers to the cards. 


10. Finish them up with a piece of Chipboard.


     Remember to come back later to see how I use these cards on a double page layout, with the Simple Stories (Simple Vintage Traveler) Collection from FotoBella.com!