Shop FotoBella

Shop for Scrapbooking Supplies by Product Type Shop for Scrapbooking Supplies by Brand Shop for Scrapbooking Supplies by Layout Theme Shop for Scrapbooking Supplies by Color

Search This Blog

Friday, November 30, 2018

Stamped Snowmen Card - Prima (Snow Suit Cling Stamp Set)

Hello Crafty Friends,
This adorable snowman stamp is by Prima (Baby Snow Suit).  He alone has spotted Santa flying in the night sky. To give him a quirky inquisitive look, separate his head from his body and then reattach it with dimensional foam tape looking upward.  Stamp Santa onto transparency using permanent black ink and add a red gem for Rudolph's nose.  Some quick shading with colored pencils gives the snowmen their personality and by simply tearing the edge of white paper one can create realistic snow drifts.  The snowflake background was created with stamps and a quick squirt of glimmer mist mica sprays.

A Closer Look:

FotoBella Supplies:
Ranger Dina Wakley Media Mica Sprays
Prima Marketing Julie Nutting Doll Stamp Baby Snow Suit 2.5x3.5
Ranger Inkssentials Glossy Accents


Other Supplies:

  • card base
  • white card stock and vellum
  • colored pencils
  • black permanent ink pad
  • transparency
  • stamps - snowflakes, moon, Santa with sleigh (Blank Page Muse Rubber Stamps)
  • dimensional foam tape
  • gem 
  • liquid adhesive

    To see more projects by our wonderful Designer Karen visit her blog, Art & Soul.

Thursday, November 29, 2018

Naughty or Nice Scrapbook Layout - Simple Stories (Sub Zero)

Hello FotoBella Fans,
It's Karen here!  You are going to love the Simple Stories (Sub Zero) collection for its bright colors and quirky Winter animals. The theme for the kit is outdoor Winter fun but it is suitable for so much more.  I wanted to share its versatility by using it for my holiday layout of my nephew's visit to meet Santa.  Follow along, as I share my step by step directions for including an accordion fold mini album that will hold five additional photos.  This clever mini album adds a fun kinetic element to the layout.  Let's go!

Directions:
1. Trim .25" from both sides of a 12x12" patterned paper.  Matte with red card stock.

2. Cut a 4x12" strip of a solid color card stock to create the mini accordion fold album.

3. Use a scoring board and scoring tool to make three parallel lines. Score lines 3" apart along the 12" side to form four 3x4" sections.
Make an accordion book by alternating valley and mountain folds.

Attach a decorative cover to the first page.

Apply background paper to the 3x4" sections. 
Matte photos and adhere them to the remaining sections.

Embellish with strips of washi tape.

Decorate each page with matching sticker embellishments.

TIPS: The mini album has eight sections and can hold six photos, a cover, and a last page.  Be sure to leave the last page blank so that it can be adhered to the layout.  Adhere small tabs along the right side as a convenient handle to open the mini album.

4. Matte a 4x6"photo with pattern paper.  Trim a 4x6" card to be used as a journaling block, matte with card stock, and adhere to the layout.

5.  Adhere an additional green strip and embellish with snowflakes. 

6. Add a large title and embellish with white enamel dots.


A Closer Look:


FotoBella Supplies:

Simple Stories Sub Zero 12x12 Collection Kit
Simple Stories Sub Zero 6x12 Chipboard
Simple Stories Sub Zero Bits & Pieces
Simple Stories Sub Zero 4x6 Stickers
Simple Stories Sub Zero Feelin Frosty Washi Tape
Simple Stories Sub Zero 12x12 Collectors Essential Kit

Other Supplies:
  • scoring board and scoring tool
  • red and green cardstock
  • 3D foam tape
  • alphabet stickers
  • enamel dots
To see more amazing projects by our Designer Karen, please visit her blog, Art & Soul.

Tuesday, November 27, 2018

Holiday Gift Wrap

Hey everyone, Brandy from goodstuffmama.com here to share a quick way to create a gift to keep on hand for those who stop by unexpectedly with a treat for you -- or for teachers or large group gift exchanges.

I drink hot tea even in the summer months, so the idea of gifting tea to someone else to enjoy is always exciting to me.

I used the Carta Bella Let it Snow 12X12 paper and cut a tea gift container out using my Silhouette - but if you don't have a Silhouette, don't fret - you can also cut two long tags and crease them, adhere them at the bottoms and tack the tea bag inside with a glue dot.


I finished it off by tying the top together with twine.

Wednesday, November 21, 2018

Carta bella and echo park snowman and christmas cards


Hi all, Jennifer Taylor here. I am stopping by today to share a couple of fun cards I made using the winter and Christmas rubons and enamel shapes from echo park and carta bella. The polka dot papers I used were nice and thick and made great A2 size card bases. So I got rubbing and added some details with enamel dot, shapes and a white gel pen.


I had snow much fun making these cards!


here are supplies I used from the fotobella online shop:


Carta bella cabin fever rubons 


Carta Bella Silver Foil 12x12 Collection Kit


thanks for stopping by and happy creating!


Jennifer Taylor


Tuesday, November 20, 2018

Bo Bunny (Land of Wonder) ATC's

     Hello again! Drea here with a tutorial for this set of ATC's (Artist Trading Cards) featuring the fun and whimsical Bo Bunny (Land of Wonder) I Want It All Bundle from FotoBella.com.


*******************************
Supplies:
                                                                  
Bo Bunny (Land of Wonder) I Want It All Bundle                          
Bo Bunny (Land of Wonder) Coordinating Double Dot Paper Bundle        

Tools:

Corner Punch
- Scissors
- Glue
                                                                 
Directions:

1. Cut 8 cards from the back of the (Land of Wonder) Roses Paper. Lightly distress edges. I just used my finger nail, but you could also use the Tim Holtz Paper Distresser. 


2. Back 6 tags from the stickers with the Coordinating Double Dot Papers, and distress edges. I decided not to use a tag on the Queen and King cards. 


3. Glue tags to the cards, fussy-cutting some of the hearts and butterflies along the bottom, so they can still be seen and overlap the tags.


4. Adhere a banner strip from the Sticker sheet to each tag.


5. Attach Bo Bunny (Land of Wonder) Brads to the tops of each tag. 


6. For the Queen and King, attach a long brad to the bottom left, and a brad with a banner to the top right, after the next step. 


7. Attach each card to some of the Coordinating Double Dot Papers cut at 4 1/4" X 3 1/4", and use a corner punch on the corners. Finally, distress the edges.


          Thanks for your visit, and get the Bo Bunny (Land of Wonder) I Want It All Bundle at FotoBella.com!

Friday, November 16, 2018

Happy Button Day! - Christmas Cards (Simple Stories)

Happy Button Day!  If you are like me, buttons are one of my favorite embellishments.  I have fond memories of rummaging through my mother's button box which felt like special treasures to me.  Today I featured buttons on some festive Christmas cards.  The paper is from the Simple Stories collection called Sub Zero. It is the perfect combination of bright colors that celebrates the fun of the Winter months.  I hope I have inspired you to dig out your button collection and feature them prominently on your next project.


FotoBella Supplies:
Simple Stories Sub Zero 12x12 Collection Kit
Simple Stories Sub Zero 12x12 Collectors Essential Kit


Other Supplies:

  • card base
  • card stock (green, white, black)
  • black ink pad
  • 3D foam tape
  • buttons
  • ribbon
  • alphabet stickers

    To see more projects by our Designer Karen visit her blog, Art & Soul.

Button Day with Bo Bunny (Land of Wonder)

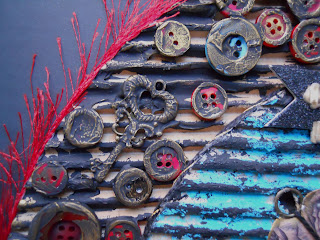
     Hello and happy  National Button Day! Drea here, and I'm so excited to be posting my third annual project for the FotoBella Design Team, celebrating this special day dedicated to BUTTONS! This year I dug into my own stash, to create this mixed media piece made from cardboard and the Bo Bunny (Land of Wonder) I Want It All Bundle from FotoBella.com.


     I love recycling pieces of cardboard, but especially the circles, like the large one used here, saved from a frozen pizza! The smaller one was leftover from a set of pans, and both started with a coat of Prima Marketing Black Gesso. Then I glued red, black, and blue buttons to the rim of the larger circle, along with some FotoBella Vintage Charms. Next, I covered them with a light coat of black gesso, so the original colors could show through. After it dried, I highlighted all of the texture with Prima Marketing Metallique Waxes (Bronze Age and Vintage Gold), and finished the edges with some red fiber.


     The smaller circle was given additional texture with Prima Marketing Patina Effects Paste (Blue). Then I added dies from the Noteworthy pack, rubbing the edges of the center one with some Metallique Wax (Vintage Gold). To resemble a button, I added some large grommets with my Crop-A-Dial II Big Bite, strung with some black and gold fibers.


          I overlapped part of the key die cut with the bottle, onto the larger circle, adhering it with some pop dots. 


     The other key comes from the Layered Chipboard. Then I finished the edges of the smaller circle with some black and gold fibers. 


     Thanks for looking, and shop FotoBella.com for your Buttons and the Bo Bunny (Land of Wonder) I Want It All Bundle!