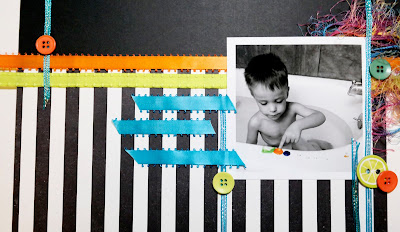
My Mind's Eye Wildberry Layout
MME Wildberry Love Stamped Sheet
1 My Colors Cardstock – Black Bear
Ribbon Package
MME Jubilee Buttons
1 Image 3.5” x 3.5”
Paper Cutter
Scissors/Knife
Ruler
Hot Glue Gun
Adhesive
Find
all of your supplies.
Cut the label off the Love Stamped Sheet.
Cut a
3.5” x 12” strip from the Black Cardstock
With
your adhesive, secure the Black cardstock to the top of the striped sheet, I
chose to place the backside of the cardstock up, because I didn’t want the
shine on the layout.
Find
the multi colored fibers from the Ribbon Package. Wrap it loosely around your
hand, to form it into a circle.
Lay it down, to
keep it in a circle shape.
Heat up your hot glue gun.
Find the orange and yellow ribbon from the
Ribbon Package. With the hot glue gun,
secure the orange ribbon on the seam of the black cardstock. Only glue a small
strip at a time, it will be easier to control and you can make sure it is
straight.
Then
you can glue the yellow ribbon below the orange.
With the glue gun, attach the fiber strand. Set it on the
page where you want it and then you can lift areas and place a glue dot under
it.
Place
your image on the fiber circle, covering about half of it. Secure this to the
page.
Find
the thin blue ribbon from the ribbon package. Cut a piece about 3”, and secure
to the left side of the page. Place it about 1” in from the edge, and
overlapping the orange and yellow ribbon.
Glue
an orange button, centered on top of the blue ribbon, right above the orange
ribbon.
Cut a
4” blue ribbon piece, hot glue it down, on the left side of your image. Then
glue a green button, centered on the blue ribbon, in the corner of the image.
Glue a
7” blue ribbon piece to the right side of the image. I placed it on the white
border area of the image. Glue a second 2” blue ribbon piece just to the left
of it, overlapping the lower part of the image. Secure the green lime button,
and a small orange button to the bottom right corner of our image.
Grab
the blue satin ribbon, and cut three 3” strips. Hot glue them to the page,
horizontally, on the left side of your image. You can stagger them to add more
interest.
Secure
the ‘Love’ chipboard sticker from the button pack, on the middle blue ribbon
piece. Have the right side of the chipboard overlap your image. Place 1 black
jewel in the holes on each side of the chipboard sticker.
Add
the final touches, like this green button on the top right corner of your
image.


No comments:
Post a Comment