Shop FotoBella

Shop for Scrapbooking Supplies by Product Type Shop for Scrapbooking Supplies by Brand Shop for Scrapbooking Supplies by Layout Theme Shop for Scrapbooking Supplies by Color

Search This Blog

Friday, August 26, 2016

MME Wildberry 4 Card Set

My Mind's Eye Wildberry 4 Card Set


MME Wildberry Love Paint Sheet
MME Wildberry Love Stamped Sheet
MME Wildberry Life Tribal Sheet
MME Wildberry Today Sketch Sheet
MME Wildberry Hey You Gardens Sheet
1 My Colors Cardstock – Black Bear
1 My Colors Cardstock – B’Dazzled Blue
1 My Colors Cardstock – Imperial Red
MME Jubilee Chipboard

 Bo Bunny Blossoms


Paper Cutter
Knife or Paper Edger
Ruler
Pencil
 Black Marker

Adhesive


Find the Love, Life Trial, Today and Hey You Sheets.


Cut a 6’ x 8” piece from each of the sheets.


Fold each piece in half, so you will have a 6” x 4” card base.


Grab the Blue, Black and Red solid cardstock sheets. 


Cut one 5” x 3” piece of the Red and Black sheet. Cut two 5” x 3” piece of the Blue Sheet. 


With the sheets, a ruler and pencil, measure one 4” x 1” piece and three 1” x 1” piece from each sheet. Make sure you mark and cut the pieces with prints placed visually how you like them. See next photo for an idea of print placement. 


Here are how I chose to cut my detail pieces, you can cut them however you prefer. 


With a paper edger, or a sharp knife edge, rough up the edges of the small paper pieces and the solid cardstock pieces. 


Begin to secure the solid cardstock pieces, centered on the front of the cards. View the images to see which color to place on each card. With adhesive, secure the blue cardstock on the Love Floral Card. 


Next, adhere the small paper pieces to the card. Make sure the open end of the card is facing you. 


When placing the small paper pieces to the card, make sure the outer visible area of the cardstock is even, all the way around. The space between the paper pieces will be much smaller, see images for spacing suggestion. 


For the Life Tribal Card, secure the black cardstock and the Today Floral pieces. Notice that I have reversed the placement of the pieces on this card. 


On the Hey You Floral Card, secure the red cardstock and the red Love pieces. 


On the Today Dot Card, secure the blue cardstock and the Today Heart pieces. 


Grab your ruler and black marker.


Draw dotted lines around the solid cardstock and each of the small detail paper pieces. Draw them about 1/8” in from the edge. 


Continue drawing dotted lines on each of the cards.


Find the MME Jubilee Chipboard Sheet and the Bo Bunny Blossoms. 


For the Love Floral Card, secure the flower print heart and ‘hey’ saying from the chipboard sticker sheet. 


On the Hey You Floral Card, secure this yellow flower chipboard sticker in the lower left corner of the card. 


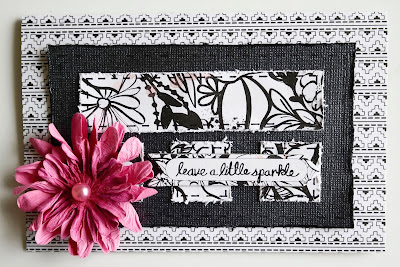
For the Life Tribal Card, secure a Bo Bunny Blossom to the lower left corner and the ‘leave a little sparkle’ chipboard sticker across the center of the squares. 


For the Today Dot Card, stick the ‘lovin it’ and green heart chipboard sticker to the center of the lower right square on the card. 


Monday, August 22, 2016

MME Wildberry Double Page Layout

My Mind's Eye Wildberry Layout 


2 MME Wildberry Life Sheets
1 MME Wildberry Today Sheet
1 MME Wildberry Hey You Sheet
MME Jubilee Enamel Shapes
2 My Colors Cardstock – Polar Bear

2 Images 10.75” x 7”


Paper Cutter
Scissors/Knife
Ruler
Pencil
Adhesive

Grab 2 Green Wildberry Life Sheets, 1 Wildberry Today Sheet, 1 Wildberry Hey You Sheet, 2 White Cardstock Sheets and the Jubilee Enamel Shapes.


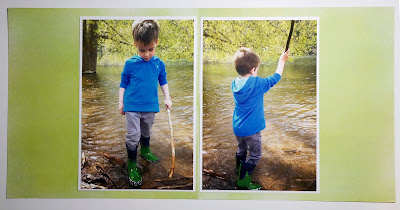
Print out 2 of your favorite photos, both about 10.75” x 7”.  


With the Life Sheets, please one right side up, the other upside down. I did this because of the color variation, I wanted the lighter areas on the inside, the darker on the outside.


Cut off the label strips on each sheet.
Cut the White Cardstock 11” x 7.25”. Adhere each photo onto one White Cardstock.


Grab the Wildberry Today Sheet. With some water and your finger, trace a couple of sayings with water. Let the water soak in.


Once the water has soaked into the paper, you can gently tear the saying out of the sheet. It tears easily, but make sure you guide it, so you get the full image in your torn piece.


Repeat that process on a couple sayings. I chose ‘Having a Blast’, ‘Best Day Ever’ and ‘Awesome’. Once you have them torn out, set aside to dry.


With a straightedge and a knife, or scissors, cut a variety of shapes out of the Hey You Sheet. Cut some larger shapes with multiple colors, as well as some small, single color shapes.


Gather your words and cut out shapes. I tore the Best Day Ever phrase into individual words and placed them on the left layout page. Place the words and shapes on each page as you like. From here you can decide if you need to cut more shapes to fill the space.


Attach each image to the Life Sheet. You should have ½” on the top and bottom, and ¼” on the side to the edge of the Life Sheet. 
With adhesive, attach the words and shapes around the images.


Once you have the layouts all secured, grab the Enamel Shapes.


Stick a few of the enamel shapes around the layout.


Thursday, August 18, 2016

August 2 Cards / 2 Tags Membership Kit

If you're looking for a cool way to spend these hot summer days, and satisfy your creative cravings, you might consider a Fotobella.com monthly membership kit!

We make it easy for you to create beautiful cards and tags using Graphic 45's gorgeous calendar collection "A Children's Hour"!
Card & Tag A
Each month the class kit will include supplies and step-by-step tutorials for 2 cards and 2 tags.  There will be new techniques and embellishments each month. 
Card & Tag B 

August's kit features an end-of-summer theme, featuring shiny red apples combined with pretty sunflowers and those vintage-style images of children we've come to love from Graphic 45 

Close-up of Tag A
Close-up of Tag B
Become a member of FotoBella.com and take advantage of even more specials and discounts made exclusive to members only. Spend $100 or more and have your order shipped for free anywhere in the continental US.

Some previous kits still available.  Please consult website!

*75 points will be rewarded to you when you buy this item

Wednesday, August 17, 2016

MME Wildberry Single Page Layout


 My Mind's Eye Wildberry Layout


MME Wildberry Love Stamped Sheet
1 My Colors Cardstock – Black Bear
Ribbon Package
MME Jubilee Buttons 

1 Image 3.5” x 3.5”

Paper Cutter
Scissors/Knife
Ruler
Hot Glue Gun
Adhesive

Find all of your supplies.


Cut the label off the Love Stamped Sheet.

Cut a 3.5” x 12” strip from the Black Cardstock


With your adhesive, secure the Black cardstock to the top of the striped sheet, I chose to place the backside of the cardstock up, because I didn’t want the shine on the layout.


Find the multi colored fibers from the Ribbon Package. Wrap it loosely around your hand, to form it into a circle.


Lay it down, to keep it in a circle shape.

Heat up your hot glue gun.


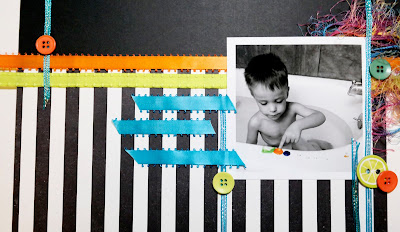
Find the orange and yellow ribbon from the Ribbon Package.  With the hot glue gun, secure the orange ribbon on the seam of the black cardstock. Only glue a small strip at a time, it will be easier to control and you can make sure it is straight.

Then you can glue the yellow ribbon below the orange.


With the glue gun, attach the fiber strand. Set it on the page where you want it and then you can lift areas and place a glue dot under it.


Place your image on the fiber circle, covering about half of it. Secure this to the page.

Find the thin blue ribbon from the ribbon package. Cut a piece about 3”, and secure to the left side of the page. Place it about 1” in from the edge, and overlapping the orange and yellow ribbon.


Glue an orange button, centered on top of the blue ribbon, right above the orange ribbon. 


Cut a 4” blue ribbon piece, hot glue it down, on the left side of your image. Then glue a green button, centered on the blue ribbon, in the corner of the image. 


Glue a 7” blue ribbon piece to the right side of the image. I placed it on the white border area of the image. Glue a second 2” blue ribbon piece just to the left of it, overlapping the lower part of the image. Secure the green lime button, and a small orange button to the bottom right corner of our image.


Grab the blue satin ribbon, and cut three 3” strips. Hot glue them to the page, horizontally, on the left side of your image. You can stagger them to add more interest.


Secure the ‘Love’ chipboard sticker from the button pack, on the middle blue ribbon piece. Have the right side of the chipboard overlap your image. Place 1 black jewel in the holes on each side of the chipboard sticker.


Add the final touches, like this green button on the top right corner of your image.