Shop FotoBella

Shop for Scrapbooking Supplies by Product Type Shop for Scrapbooking Supplies by Brand Shop for Scrapbooking Supplies by Layout Theme Shop for Scrapbooking Supplies by Color

Search This Blog

Wednesday, October 31, 2012

Scrapbook your Halloween memories We R Memory Keepers Black Widow!

Check out all of the wonderful designs created by FotoBella Design Team member Nina using the haunted papers and embellishments from the We R Memory Keepers Black Window I Want It All Bundle.

Nina also provided us with step by step instructions, for a wonderful Halloween card! Make sure to scroll to the bottom to see them!


Costume Party Invitation
Supplies needed: Black Widow I Want It All! Full Collection Bundle (50 pieces) by We R Memory Keepers

1. Cut Black Widow sheet 12x6" and score at 6" Side B becomes the base of your card.
2. Take Happy Halloween (side B) and take any flower punch or dye and punch out two flowers
3. Take a paper flower from the collection and take it apart. Grab the biggest flower and cut in half.
4. Place cut flower on top and bottom under the chipboard sticker “Costume Party” also place the other two flowers you previously punched on corners of “Costume Party”
5. Place a fabric button on flower in the upper right hand corner of flower.
6. Place a cupcake sticker from collection on the bottom right hand corner.
7. Place star stickers from collection randomly on card.


Make sure to join our We R Monthly Membership to reserve your I Want It All! Bundle each month. Plus our special bonus Tool Kit has been extended through Nov. 5th.

Wednesday, October 17, 2012

Tuesday, October 16, 2012

Handmade Mini Album Giveaway


Our design team member, Sarinda Jones has a few design team projects she would like to giveaway to some lucky friends of FotoBella.

She was nice enough to provide the step-by-step tutorial to create this gorgeous Dream Big Mini Album using the Tell Your Story Bundle by Teresa Collins and now she is generously going to give it away! How wonderful is that? 


To be entered to win:

1. Leave us a comment on this blog post telling us what one of your BIG DREAMS are (if you care to share)

and...

2. Hop on over to the FotoBella Facebook Page to LIKE us and leave us a comment that you'd like to win the Dream Big Mini Album.

We'll pick one random winner this Saturday, October 20th  Monday, October 22nd and announce it here on the blog as well as on our Facebook Page.

Good luck and happy scrapping!

UPDATE: We've extended your chance to participate in this giveaway!
Make sure to post your comment by October 21st to win!

Friday, October 12, 2012

Halloween Craft Ideas from Lifestyle Crafts

Make It Magazine from Lifestyle Crafts If you love Halloween and all the spookiness and crafty cuteness that comes with it, you won't want to miss this issue of Make It magazine from Lifestyle Crafts. Inside you'll find it packed with creative ideas to spook up your space this Halloween.

If you find yourself wanting to recreate any of the Halloween goodies you see here, float on over (ghost-like) to our take advantage of our Spooktacular Savings Event, where you'll find all Lifestyle Crafts Dies and All Halloween-themed Items are 20% off through October 18, 2012 with coupon code SPOOKY.


Open publication - Free publishing

Here are some handy links to get the dies / letterpress plates for some of our favorite projects!

Friday, October 5, 2012

New Design Team and Survey Winner

I am so impressed with all of the talent I have seen in the last couple of weeks while reviewing the design team submissions! I wish we could include everyone!

After much deliberation, we have selected six team members, each with a unique style and great talent. Once again, we are excited to have a very mixed group of experienced, published paper artists and fresh new faces.

I am excited to introduce the new FotoBella Design Team!

Apryl Holland

Hi! My name is Apryl Holland. I am blessed with raising a beautiful family and enjoying the hustle and bustle of all that life brings. I live in a friendly beach town in Southern California with my husband, two children, and cute little min pin Daisy Duke.

I began scrapbooking 15 years ago and I can say I love it! My paradise is escaping to my scrapbook room (the woman cove) in the attic, putting on a good movie on Netflix and crafting to my heart's content. I also enjoy cooking, baking, being silly with my kids, and just being me. 
www.onescrappysoul.blogspot.com 
KimberlyRae Ford

My name is KimberlyRae, I live in Eastern Washington with my husband and two boys.  I enjoy spending time with my family, boating, gardening, sewing, travel, and Art of Any kind!

Art is my passion-I'm challenged by anything that can be created with my hands!   I have made many digital/hybrid layouts over the years and my work has been published in many magazines. I also make paper jewelry from paper beads and stamps. I've sewn for many years and used to design children's clothing.  Even though I've only been creating with paper for a couple of years I'm totally addicted and feel at home with paper, fabric, fiber, wire and glue! I'm always up for new and exciting challenges and use any new crafty tool I can get my hands on to create with!
kreationsbykimberlyrae.com/blog/

Kim McMahon-Rosenberger 

I am a veteran to the scrapbooking world. I have been scrapbooking and papercrafting for almost 17 years.

Currently, I am an independent class instructor specializing in scrapbooking, paper crafting, mixed media and altered arts. I was altered arts before mixed media became a catch phrase in the industry :) I have worked at several scrapbook stores, designed for scrapbook companies and taught classes for almost 10 years.

As I have fallen into a specific style, I have figured out who I am as an "artist" and love to share my passion with others.
www.lifeembellishedinc.com/blog.html
Lisa Wilkinson


My name is Lisa Wilkinson. I am a mommy to 6. A wife to the love of my life. A home schooler, a creative gal who finds joy in creating something everyday, whether it be a craft or activity for my children, something to add a little spice to our home or a cherished layout for our scrapbooks that will be meaningful and lasting. 

I am always creating something and that brings me such joy! I have been scrapbooking for over a dozen years and if you read my blog you will see my style has slowly evolved into what it is now... layered, lumpy, bumpy, misty, sewed on, with a lot of white space. It is "organized-messy".   I am currently loving... layers with stories and heart.

And welcome back Sarinda and Jeri!

Sarinda Jones
Hi, my name is Sarinda Jones. I live in Salt Lake City with my husband and son. I'm an artsy scrapper, art journaler, mixed-media artist, jeweler and glass artist. I Love it. I try to capture that moment in my life through art. I enjoy the whole process of making art. From the beginning till the end. I like to use different techniques. Everything is spontaneous and I never know what I will get at the end, trusting the process from the start. In my opinion this is the most exiting part of making an art. I can describe my style as mixing of different styles. I don't want to limit myself to the one style. Face the brilliance of your most wonderful creations and dwell on your dreams. I believe in teaching, the sharing of ideas and the playfulness of creating. I excited to be apart of this amazing team.
Jeri Vann
Originally from Utah, I moved to LA and graduated from FIDM with a degree in Product Development. I then went on to work in the apparel industry. I became a statistic of the economy downshift and was laid off. So to keep my sanity in my free time I became intrigued with projects that included paper, beads and basically anything I had laying around the house. I love to create cards, gift tags, gift baskets as well as jewelry and my own custom wall decor. I love to challenge myself with out of the ordinary projects and create one of a kind pieces that I either sell or use myself. I love doing anything creative and unique, and I am constantly researching what is new and creative to get inspiration for a new creation of my own.


Of course we have one more thing to announce today!! The big winner of our $200 gift certificate. Thank you to everyone who participated in our survey. You have given us great insights and feedback.

Our lucky winner is Jennifer Brockob! 
Jennifer, expect your gift certificate later today in your email!

Wednesday, October 3, 2012

Teresa Collins Design Team Projects

Sarinda has used two Teresa Collins collection to create a mini album and an artistic tag.


Teresa Collins “Tell Your Story”

Mini Dream Big Album
Created By: Sarinda Jones

What you will need:
Ribbon
Wood dowels or toothpicks
Scissors
Tape and or glue
Pen


Step 1
Find Large Journaling cards paper and cut out 4. Then arrange into the order that you would like your mini album.


Step 2
Punch two holes along left side about half inch from side.


Step 3
Find flashcard pack pull out Dream Big and Journal distress edges.


Step 4
Locate Emerson quote on chipboard elements.


Step 5
Stage the elements on the cover of your album. Find Chipboard button add ribbon to the button then cut lace to the length of the album page.


Step 6
Make Flags with Decorative Tape.
Wrap the tape onto the wooden dowel or toothpick then cut in flag shape.


Step 7
Stage the album page again. With all the elements as shown below.  Once you have everything where you would like it start to glue down the pieces. Starting with the lace. Locate two small butterflies from layed stickers add to right edge of quote.


Congrats-! Your cover page is done. Flip cover over to do the second page.

Step 8
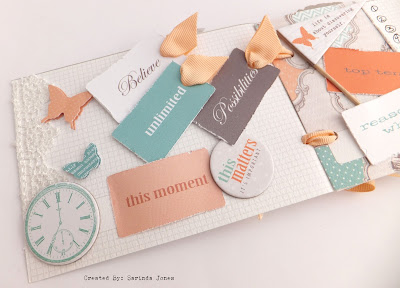
Find flashcards that say this moment, Believe, Unlimited, and Possibilities.
Distress the edges.


Step 9
Find the clock in the chipboard elements as well the circle that says “this matters it’s important” Find the flashcard that says “this moment” add glue or tape to the two outside edges. You are creating a pocket for the other flashcards to go into. Add the clock to the left.


Add 2” of lace to the left edge of the page. Punch holes in the Remaining flashcard then add ribbon then a dot of glue to the inside of the ribbon, press close. Cut the desired length then place into the pocket. Locate the “This matters” chipboard piece place next to the pocket. Add two butterflies to the right of the lace.


Congrats-! Your second page is complete.

Step 10
Find your second journaling card or third page. Take a wooden dowel or toothpick and add the banner from the chipboard elements “ Life is about discovering yourself”. Look for flashcards “top ten “and “reasons why”. Distress edges.

Find Journaling tag with the grid pattern cut to 2.5” x 3.5” Save the discarded piece for later. Distress edges and write 1-10 along the left side. This is to be used for the top 10 reasons why you should do what you love to do.

Glue the elements to the page as shown below.


Congrats-!! You have completed your 2nd &  3rd pages-!!

Step 11
 Add 5 strips of the decorative tape to the left side of page in a layered fashion, horizontally. Locate the journaling card that you discarded in step 10, distress edges and glue on top of the layered tape. This is a great spot for a 3”x 3” photo or journaling.


Step 12
Locate journaling card with gray and white dot pattern. Add decoritive tape to the top of the page on the left to middle in vertical orientation. Find Flashcards: “Because, You are Special and Playful. Distress the edges.

Find chipboard element that is an ornamental frame that matches image on page. Place chipboard over image. Add flashcards layered on top of each other. Find layered butterfly sticker place on top of chipboard element.


Congrats-!! Pages 3 & 4 are complete-!!!

Step 13
 Flip over page. Place 2 stripes of orange dot decorative tape to the left of page about 1” from left edge. Find chipboard element scalloped green dot, place to left of tape and cut off excess, save for excess for next page. Locate the chipboard element quote “These are the moments I want to Remember….” Place on top of tape. Locate “Tell your story” chipboard element place on top of page just over edge. Locate flashcard “ Always” Distress edges and glue under the chipboard element “tell your story”. Find Layered Butterfly stickers and take large one place on lower half of page the 2 others just above like image below.


Step 14
Find floral journaling card. Use discarded scalloped green dot chipboard element place on the left bottom side of page. Locate the “Love this Moment” chipboard element circle place 1” from right side of page. Then place 3 layered butterfly stickers to page as shown below. Another great page for an inspiring image.


Congrats-!!! You have completed all your pages-! Now we need to put it all together.

Step 15
Stack all the pages on top of each other make sure the holes are lined up. Take ribbon and thread through the top hole in all the pages.


Do the same with the bottom hole. Tie the ribbons into bows…


Teresa Collins
Vintage Finds Bundle
Inspire Tag By: Sarinda Jones


What you will need:
Stapler
2 Kraft Tags Tim Holtz/ Ranger
Black ribbon
Twine
Safety Pins

Step 1
Cut one of the two tags to 2.5”
Punch holes into the bottom of full tag and the top of the cut tag, about .25” from edge.


Step 2
Cut 2.75” x 5.25” strip from Orange Damask Paper and also cut for small bottom tag 2.75” x 2.25” Distress edges. Glue to tag.


Step 3
Cut 2.5” x 5” Music paper and also cut for the small bottom tag
2.5” x 2” Distress edges. Glue to tag.


Then take the small bottom tag and rip in half Roll the inside edges of the paper, the ripped edge.


Step 4
Find Inspire flashcard and place under ripped music paper. Glue in place.


Then Staple the two edges.


Step 5
Find the sticker sheet. Find the honeycomb stickers. Black, orange small dot, yellow half, 2 line half. Place on upper half of tag like image below.


Step 6
Cut sparkle banner strip for the ends of the badge tails. Approx. 2.5”
Find the tickets 61 & 5.
Then find the chipboard circle with damask design.


Assemble and glue like the image below. 


Step 7
Find the black bling and place onto the tag like the image below.


Step 8
Add Safety pins to attach the two tags.


Step 9
Take the black ribbon cut approx. 4 inches thread it through the top hole of the tag.


Find white leaf button add twine to the button like image below.


Tie bow. Find Crossed hatched button and add to tag next to large black bling.