Shop FotoBella

Shop for Scrapbooking Supplies by Product Type Shop for Scrapbooking Supplies by Brand Shop for Scrapbooking Supplies by Layout Theme Shop for Scrapbooking Supplies by Color

Search This Blog

Monday, December 30, 2013

Echo Park Reflections Christmas Santa Tag

I'm just loving the new Christmas collections by Echo Park! I used Reflections Christmas to make this Santa tag.

I cut the tag from black cardstock with my Cricut, and inked the edges with white ink. Then I added a silver grommet to the top using my Big Bite. The tassle was made from cream embroidery thread and torn up muslin which I had previously dyed. I added the brads just how they came in the package, with the snowflake and black doily behind them.  But my favorite is the layered chipboard Santa! There's so much to love with this collection, and it's perfect for all of your holiday photos! I'm getting ready to scrap mine now, and will be back later to show you what I've done.

Saturday, December 28, 2013

Basic Grey RSVP Amazing and Awesome Layout

Hello!  In case my other posts haven't completely made it clear :) I love this Basic Grey line.  I created this layout using the  Basic Grey RSVP I want it all bundle.   I have manged to create 5 layouts, a card and a tag with this bundle and still have enough to make more which makes me so happy!

I did this quick layout of my little girl, Jaleesa.  This picture is one of the first that I took when she started really smiling for me.  She was just a couple months old.  Oh, how I love the cuddle baby stage!

This layout is really simple to recreate.  I stared with trimming my photo done to 4x4.  Then I cut the yellow paper at 6x6 and the green polka dot at 6.5x6.5.  Layered them all on top of one another and then embellished until I was happy with the look.

Overall:

A few close-ups:


Thank you for taking the time to look.
Have a beautiful day! Smiles, Jessica

Thursday, December 26, 2013

FotoBella.com and My Mind's Eye Heirloom "You Make Me Happy" Card Tutorial


Hello Lovelies....
Hope your Holiday was wonderful and bright. I have a tutorial for you today and yes it is for Valentine's Day. You Make Me Happy From FotoBella.com and My Mind's Eye I want it all bundle, Heirloom.

Here is what you will need:
Supplies:
-    Items used from bundle
-    Heirloom “Adored” Paper item#LF4001
-    Heirloom “Sweet” Paper item #LF4003
-    Heirloom Pockets
-    Heirloom Ephemera Pack
-    Heirloom Enamel dots
-    Heirloom Layered Stickers

·  Ribbon
·  Cream card stock
·  3D Tape
·  Tombow Multi Glue
·  Distress Ink Walnut

Tools:
  • Hole Punch
  • Paper Trimmer
  • Tim Holtz Mini Stapler
  • Boarder Punch
  • Scissors
  • Distress blending tool

1.     Cut cream card stock to 5”x5” Card base.  Trim paper to 5” x 10’ score at 5”. Trim Sweet paper to 4.5”x4.5”. Trim 1”x4.” strip of Adored paper. Boarder punch strip.


2.     Take all of these components and Distress ink all edges.  Doily, You make me happy banner, from Ephemera pack, Heirloom pocket, 1” boarder punch paper strip, I will always love you Journal card.


3.     Take 4.5”x4.5”, add strip with border punch 1.25” from bottom. Then add the ribbon and wrap around card stock. Adhere to the cream card stock base with 3D tape.

4.     Adhere Doily to left side of card.
5.     Adhere pocket with 3D tape to the right side of card.

6.     Punch hole into journal card I will always love you. Add ribbon to the top through the hole. Staple with Tim Holtz Mini Stapler. Trim ribbon in a “V” cut. Insert into pocket.


7.     Add Enamel dots to You Make Me Happy Banner. Adhere to the front of card with 3D tape. 
Tip: you might want to double up on the tape that over hangs on the left end.

8.     Find the sparkle LOVE from the Ephemera Pack and glue it just above the banner.

9.     Find the layered sticker heart and a sparkle arrow from Ephemera Pack. Glue the arrow to the pocket and place the layered heart on top.


Thank you for joining me in this tutorial.
Much Love and Kindness to you.
Sarinda

Saturday, December 21, 2013

Basic Grey Wooden Gift Tag

Hello, Jessica here.  I wanted to to share with you a gift tag I created using the Basic Grey I want it all bundle.  The bundle comes with these great wooden tags.  I basically started with wooden tag as the base.  From there I cut a piece of patterned paper to attach to the bottom.  Then I started layering different embellishments until I was happy with the look.


Thank you for stopping by to take a look.
Have a beautiful day! Smiles, Jessica

Friday, December 20, 2013

4x4 Holiday Gift Box with Tutorial

4x4 Holiday Gift Box


Supplies:
 Merry Notes Sheet
Jute Cord
Tools:
Hot Glue Gun 

First, grab the Merry Notes Sheet (or any other sheet you love), and the We R Memory Keepers Gift Box Punch.


 The directions that come with this Gift Box Punch are very easy to follow. Basically, use the size guide on the plate of the punch, and it will tell you what size to crop your paper to, and where exactly to place the paper on the board to punch and score it. I chose the 4x4 box, so I lined my page up on the XL line.
Follow the directions to punch and score all 4 edges of this side of the page.


Turn the page over to punch and score the remaining sides of the page.


Flip the paper back over to the side you want on the outside of the box. Use the ‘reverse’ punch on each corner. This will round the edge and make a little notch that will hook the flaps closed.


Once you have finished punching and scoring, fold each of the score lines so it is easy to create the box. Start to push the sides toward the inside of the box. See the image.  


If you squeeze the box sides together, as the image shows, the inserts will be on the inside.


I used a hot glue gun to glue the inserts down.


Then you can fold the top flaps together with the punched notches.
This box looks absolutely beautiful as it is right now! But here is the fun part. You can decorate this as much, or as little as you wish.


I chose a simple approach. Grab this cute Ornament from the Chipboard Sheet. Use a hole punch at the top.


Choose a small part of one of the many beautiful pages of this amazing bundle for the tag. Cut a rectangle piece out, and then cut the top part to a point. Punch a hole in this as well.


Finish this adorable gift box with some jute cord and attach the tag and ornament.
Such a quick and easy way to make your gifts look custom and tailor made for that special someone. 


Tuesday, December 17, 2013

Basic Grey RSVP So Fun layout

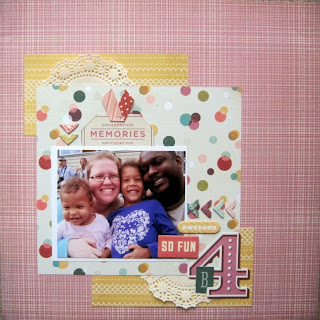
Welcome! I wanted to show you another layout I did using the Basic Grey RSVP I want it all bundle.  I actually decided to do this layout and turn the original layout of just my girls into a double page layout. I took that layout and rotated it 90 degrees to create this page.  I do this a lot.  It makes creating a double page layout super fast and easy.  So know that you have the step by step instruction for the first layout you can easily make this one as well.

With that, let's take a look at my overall layout...

And a few close-ups of my layout...

I used my picture as a pocket space to add a tag for some hidden journaling.


Thank you for looking!  I hope you enjoyed my layout.

Have a beautiful day! Smiles, Jessica

Friday, December 13, 2013

Woodland Snowflake Tutorial

I'm so excited to share my first tutorial here using Bo bunny's Woodland Winter I want it all bundle! I'm just in LOVE with this collection of GORGEOUS papers and embellies, not to mention the colors!! Perfect with these snow pics of mine.

To make these snowflakes start by gathering some twigs outside. Using the Woodland Blizzard paper fussy cut out some snowflakes. I decided on this one that I used on the top left of my LO. Then pick another paper and cut out a circle slightly larger than your snowflake. I used Woodland Winter Journal.  Now cover the edges with gesso and glue your snowflake onto it. 

Break your twigs into 6 small pieces of about the same length and then cover with gesso, as light or heavy as your want your snow to be.  

Glue the twigs around the snowflake using the center design as your guide.

Use some bling for the center. I used this pearl, to mimic a snowball.

Then cut pieces from another snowflake to glue under the circle in between the twigs. You can get so many different results by combining different snowflakes, papers, and gems. Here's the final result.

And a closer look at the other one that I did.

If you don't have gesso you could always use white paint. Stickles or Smooch could also work to make your snowflakes sparkle. Just have fun with it!