Monday, June 30, 2014

Market Street Jewelry Card and Gift Box

Another fun, custom gift wrap idea.


This handmade necklace is a gift for a good friend, and I love to display my gifts as great as I can. I used the Gift Box Punch, and notched each side, so I could wrap the necklace around the card.
I also used the Gift Box Punch to make the gift box. And the packaging couldn't be more adorable with the fun paper in this My Mind's Eye bundle!


Saturday, June 28, 2014

Mustache Gift Card Pocket Card

If you haven't bought this super-fun Market Street Nob Hill Heights I Want It All Bundle from FotoBella yet... You need to!!
I can't get enough of the fun metallic gold options and prints in this bundle.

Here is a card I made for my cousin, celebrating her soon-to-arrive baby boy!
The 3x4 cards in this bundle are the perfect size to create gift card pockets.


Thursday, June 26, 2014

Echo Park We Are Family Pocket Page

Hello and Welcome!  Today I want to share a double page layout I did using the new Echo Park We Are Family Kit.  I didn't do a traditional double page layout however.  One the left side I did a tradtional 12x12 layout.  On the right side I used a We R Memory Keepers page divider.  I have to say it has been a little while since I have completed any pocket page layouts.  It was fun to create little layouts with in a larger layout.

This is my traditional 12x12 layout.  One of my favorite things about Echo Park are the sticker sheets.  They also provide a lot of easy to add embellishments.  I kept the layout pretty simple knowing that I would add more journaling and photos from this day on the other side.

Overall:

A few close-ups:


For the right side, I selected the page protector that had two 6x6 slots and three vertical 4x6 slots.  I cropped my pictures down to 3x4 or smaller.  I added just a few simple embellishments from the sticker sheets on each section.  I cut the 4x6 journaling card from the larger sheet of journaling cards.

This is what I added for journaling after I took the picture.
"A trip to Leesburg animal park proved to be so much fun.  It wasn't busy but you girls loved being outside to enjoy the weather.  It does amaze me sometimes at how different you two girls are.  Jalyn my little animal whisper, walked right up to every animal and feed them.  Jaleesa was a little more timid and unsure.  What I remember the most is getting to spend the day with my girls!  There is never anything better."
Overall:

A few close-ups:


Thanks for stopping by.

Jessica

Tuesday, June 24, 2014

Take A Leap Wedding Card

I love summer for numerous reasons,.. One, I love how many weddings, parties, birthdays and events there are! I love creating handmade cards and gifts for my friends and family. This month alone I get to put together custom cards, gifts and decorations for anniversaries, weddings, baby showers and birthdays!
I have been busy,.. to say the least!

Here is one of the wedding cards I have crafted.. I created a cute little gift card pocket because I loved the image on the card and I wanted it to be a focus of the card. I used some distress inks on the die-cuts to match the colors of her wedding.


Saturday, June 21, 2014

Walking on Sunshine Layout

Hello Jessica here with you today to share a layout I did using the Echo Park Walking on Sunshine kit.  I have to say that this is a fun summer kit.  The color are not as bright as a lot of the other summer lines out there.  It is a little fun to be using these calmer colors.

I have a small confession.  Sometimes I struggle with where to start with a layout.  Granted there are several sketch sites out there that you can go to for fantastic inspiration.  However, there is another idea that you can do.  Look through your own layouts.  Is there one that you just loved and could change up a little to have a new layout.  That is what I did for this layout.  I went through some older layouts and saw a layout similar to this one below.  I decided it would be perfect for a simple summer layout of my kids and our friends kids get all messy eating popsicles a fun summer staple in our house.


Overall:

A few close-ups:


So go through those layouts!  I'm sure you have a ton of inspiration right in your own scrapbooks.
Have a beautiful day! Smiles, Jessica

Friday, June 20, 2014

Happy Birthday Card Tutorial

Happy Birthday Card Tutorial


Supplies:
3x4 Card
Decorative Tape
Chipboard Button
Mixed Bag Cut Out
Strips Sheet
Yellow Bakers Twine
Green & Gold Ink Pads
Rubber Stamps
Double Sided Tape
Glue Stick
Hot Glue

Tools:
Scissors
  
Find this watercolor 3x4 Card.
Using the Gold Dot Decorative Tape, stick a strip across the top of the Card.


Cut a 3” x ½” strip from the Strips Sheet. Cut a notch in one end.
 Using a gold, or dark yellow ink pad, ink the edges of the banner strip.
With small alphabet stamps and green ink, stamp ‘Birthday’ on the banner strip.


With a red marker, run it along the edges of the Happy Cut Out. I also added a few sporadic marker lines throughout the wood, just to give it some detail.


With double sided tape, stick this circle Gold Cut out in the bottom left corner.
Stick the banner strip on top of the Gold Circle, along the bottom of the Card.


With a glue stick, smear glue on the back of the Happy Cut Out and stick it to the Card, at an upward angle.


Grab some yellow bakers twine. Wrap it back and forth a couple times.
Tie a knot in the center.
 Cut the ends.
I made this about 2” wide, finished.


Stick the Red Chipboard Button in the center of the Gold Circle.
With some hot glue, stick the bakers twine knot in the center of the button.


Here is your finished Happy Birthday Card! 


Thursday, June 19, 2014

You Are My Sunshine Layout

Hey there everyone!  I have been lovin' the new collection from Carta Bella, Ahoy There!  I've been waiting for the perfect collection to use for my cruise photos from 2012 and this is it.  I created this layout for the FotoBella Design Team.


Celebrating the New Year on a cruise is a blast!  Here's me and my little man at Formal dinner on New Year's.  Such a handsome boy.  I thought the navy's in the various papers were very elegant looking for this photo.  By adding the journal card sentiment, it gave the pop of color I needed and I complimented it by making a banner with the red paper.  


Here are some detail shots of the color accent that really make the layout.


The striped brad is from My Mind's Eye Necessities Red Collection.  It matches perfect and both these great collections can be found at FotoBella.com.  


Thanks for stopping by today!


Tuesday, June 17, 2014

You Are My Favorite Card

Hello everyone!
The more I dig into this Market Street Nob Hill Heights I Want It All Bundle by My Mind's Eye,... the more I LOVE it!!!
It might be the most versatile bundle I have had the pleasure of working with yet! 

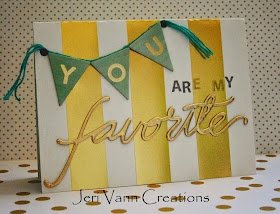
Here is my 'You Are My Favorite Card'. I made this for my husband for our anniversary. We celebrate 8 years this month. :) And as this card states, he is my absolute favorite!


Monday, June 16, 2014

Ahoy There!

Fun cruise photos and fun papers from Carta Bella's Ahoy There Collection make for a great layout.  The red striped vellum that looks amazing in this layout is from My Mind's Eye Necessities Red Collection.  


This layout has some real pizazz with the stripes, chevrons and other fun patterns.  


Embellishments are enamel dots from My Mind's Eye Blue Necessities. 


I really love all the fun layers, stickers and alphas.  

Check out all this great stuff at FotoBella.com

Have a great day!


Sunday, June 15, 2014

Herbs and Honey Happy Father's Day Card

    Happy Father's Day from FotoBella!! Here's the card that I made for my wonderful Dad, using Basic Grey's Herbs and Honey I want it all bundle. This bundle is so versatile, if you remember, I also made my Mom's Mother's Day card with it too.


    The Printed Kraft Bags were once again the perfect little pocket for cash or a gift card! I used the alpha stickers to spell out Happy Father's Day in French. The little screws came in the Die Cuts and Transparencies, along with the wood stake. The background was stenciled with a golden yellow gesso.


   I did some machine stitching, using three different colors, and added the brown sheer ribbon and yellow rick rack from my own stash. Have a fabulous Father's Day!!


Friday, June 13, 2014

Market Street ~ Ashbury Heights Altered Tea Box Tutorial

    I decided to use the new, beautiful,  My Mind's Eye (Market Street ~ Ashbury Heights), I want it all bundle, from FotoBella,  to pretty up an ordinary Celestial Tea box, that I normally would've thrown away. Since it was Cinnamon Spice it smells really good too!


     Supplies:

Other Tools and Supplies:
Martha Stewart Scallop Punch
Ribbon
Gold Ink

Directions:
1. Measure your box and score fold lines accordingly. I used almost a whole sheet of paper to cover and glue it. 


2. Apply the gold Decorative Tape about 1 1/4" from the top, going across all sides of the box.


3. Using the striped paper, cut and punch a strip to go across the top of the tape. I used a Martha Stewart Scallop punch, scored the fold lines, and inked the edges with gold ink, before threading my red ribbon through the holes. Then I glued it over the top of the tape starting in the back, but leaving the front to glue in a later step. 


4. From another sheet of the same floral paper (Garden's Paper), I cut the same white flower that's on the front of the box and curled the petals up, adhering  it on top.


5. Now you can glue the rest of your punched strip over the front of the box. Then add your brad to the center of the flower.


6. For the top of the box I just added the doily, teacup, and gold flourish that I got from the Mixed Foil Bag.


Thanks for your visit!