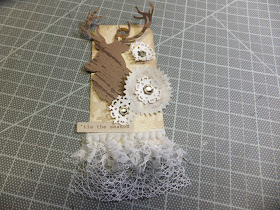
Reindeer Tag
Hello Everyone....
Sarinda here with the FotoBella.com Design Team.
I have something new and fun for you to try.
How to take a bundle and by just adding a sheet of white cardstock you can change
the whole look of your creations.
I love all the bundles from Fotobella.com, they are put together so well.
This tag can be given as a gift for a tree ornament or perhaps as part of your wrapping.
Ok get ready.... Here we go-!
Supplies:
Teresa Collins Christmas Cottage Bundle #1
Stamps
Countdown paper side B
Twine
Chipboard Stickers
Crystal Brads
Music Paper and Brad Set
Other Supplies:
White Cardstock
White Tag
Dimensional Tape
Distress Pad in Antique Linen & Walnut Stain
White Acrylic Paint
3 types of lace (each a bit smaller than the next)
Clear embossing powder
Fine Holographic Glitter
Perfect Medium Ranger
String and twine
Water
Tools:
Silhouette Cameo
Scissors
Glue Gun
Blending tool
Sponge brush
Kraft mat
Acrylic stamping block
Heat tool
Snowflake punch or use silhouette cameo
Plastic bowl with lid
Plastic spoon
1. Gather your supplies....
I know that this tag is quite different in color and is muted in comparison to this bundle. My goal here is to show you how versatile this bundle is. By creating a completely different look by just adding white cardstock.
2. Place snowflake stamps onto the acrylic block in a random
pattern. Put clear embossing powder into a plastic container and add some
glitter to the bowl, mix together with plastic spoon. Then stamp snowflakes onto
the tag with Perfect medium. Hold tag over bowl and apply the clear embossing
powder and glitter to the tag. Gently tap to remove excess powder and glitter.
Use heat tool to set.
3. Using the blending tool and Antique Linen Distress ink apply to the edges and all over the body of the tag. Then use Walnut Stain and blending tool just on the edges of the tag.
4. Starting
with the thickest lace add this to the bottom of your tag with the hot glue
gun. Repeat this with the medium lace and then the smallest lace on top.
5. Find the “Tis’ The Season” Chipboard Sticker
and place just above the lace. Do not press down too hard you may change your
mind where it really goes. Just stage it for now.
7. Find the brad with the music pattern paper
behind it. Remove the center brad and put it back on the brad folder. We are
only using the paper. Locate three clear crystal brads.
8. We are now going to mute the music brad paper
with white acrylic paint and water. Place a small dot of white acrylic paint
onto your craft mat add a bit of water to thin paint. Using the sponge brush
add to the body of the music paper with a bit more on the edges. Dry with heat
tool. Layer the music paper, snowflake and crystal brad.
9. On Silhouette cut out a Reindeer head
approximately ¾ the size of your tag. Add two layers of dimensional tape to the
back of the deer head. You just want this to pop off the page a bit more than
normal.
10. Arrange everything how you like it first
before you glue. (Staging is the biggest tip I could give you.) Notice that I
inched out the Chipboard sticker a bit to make room for the snowflakes and bow?
Once you are pleased as punch with the arrangement start to l glue. I started
with the deer and work outward.
11. Make a bow and add it to the tag using the
glue gun, just under the largest brad with music paper. Don’t forget to add the
twine and string to the top of your tag. I will be using mine as a gift tag or
I will add an ornament wire to the top and give as a tree ornament.
Congrats…. You have made a beautiful, stylish tag.
Enjoy-
Sarinda


No comments:
Post a Comment