Sunday, June 30, 2019

Easy Square Cards with the Bo Bunny Harmony Collection


Hi all, it's Annie and today I'm back with three easy square cards made with the Bo Bunny Harmony Collection.  Because the same general layout is used for all three of these, you can quickly make a variety of pretty cards for all different occasions.


The first card uses one of the beautiful frames from the Noteworthy ephemera pack in the Harmony Collection.  Since the frame is nearly five inches square, I mounted it on top of a 6" square card base covered with a piece of pink patterned paper from the collection.  A border strip wrapped with white satin ribbon was placed on the center of the card base before popping the frame up on top with foam adhesive.


To embellish, I added the word "hello" in holographic Thickers from the collection above a stamped sentiment from my stash.  Then, I popped up a dragonfly from the Noteworthy ephemera pack in the upper corner.


The next card is super simple, but I loved this little bird illustration from the 12x12 papers so much, I didn't want to detract from it!  After matting the bird image on some Café Ole cardstock, I popped it up over a 5.5" square card base created with one of the beautiful papers in the collection.


The center strip and sentiment are both cardstock stickers from the collection matted with the same brown cardstock.  A pretty holographic chipboard flourish was adhered to the side to embellish.


Again starting with a frame panel from the collection matted on Café Ole cardstock, I popped it up on top of a 5.5" square card base made from some of the pretty patterned paper.  The center band is just a border strip cut from one of the patterned paper sheets.


After adhering a "hi" spelled out in holographic Thickers, I added one of the cardstock stickers to complete the sentiment.  A glittery flower cluster and a few chipboard pennants were added to the center panel to finish off the card.

I hope you enjoyed these quick and easy square cards and thanks so much for stopping by today.  Be sure to visit the FotoBella store to pick up this beautiful collection today!

Saturday, June 29, 2019

Bo Bunny Bee-utiful Box

Hello Everyone. Olivia here with another altered box that I created.  I had this little box in my stash for a while and decided to fancy it up. For this box, I am using the Bo Bunny Bee-utiful I want it ALL Bundle.  This fantastic bundle has cardstock, chipboard, Ephemera pieces, brads and stickers.

For the top of the box I used some of the Gorgeous flower patterned paper and added a Chipboard Sticker. 


The front drawers I used some the Sunflower paper and added chipboard stickers to look like knobs. 


This is one of the sides decorated 

And here is the final side. 


Hope you guys enjoyed this project and can't want to see what projects you make with this perfect Spring time Collection. 


Thursday, June 27, 2019

Bo Bunny (Sweet Clementine) Cards

    Hello FotoBella fans! Drea here with a couple of cards featuring the Bo Bunny (Sweet Clementine) I Want It All Bundle from FotoBella.com!


     I used the same design for both cards, rounding the corners of my paper pieces with a medium and large corner punch. Then I inked the edges, along with the hearts and banners from the Noteworthy pack, using Distress Ink (Black Soot).


     The banners are a mix from the Noteworthy pack and Chipboard Stickers. 


     Then I used the Thickers' included in the bundle to spell "YOU". 


     The butterfly wings from the Noteworthy pack were curled up before adhering. Then I used the Chipboard Stickers for the main sentiment on the first card. 


     For the other card, I used the Layered Chipboard. 


     These cards are a great way to show someone you care! 


Thanks for your visit!

Tuesday, June 25, 2019

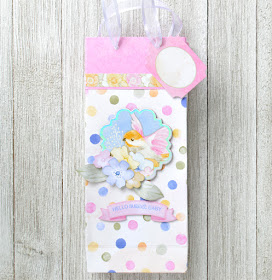
Handmade Gift Bag with the Bo Bunny Harmony Collection


Hi all, it's Annie and today I'm back with a tutorial to create a darling little gift bag with the Bo Bunny Harmony Collection that's perfect for baby showers, weddings, or just to send a happy hello!


Start by scoring the “wrong side” of a full sheet of 12” x 12” patterned paper from the Bo Bunny Harmony Collection at two inches from the top.


Turn the paper over and rotate it ninety degrees.  Then score it at 3 1/8” and 8 7/8”.


Fold the top flap downward as shown and crease the score line well with a bone folder.  Then add a decorative sticker border from the collection to the bottom of the flap.


Turn the sheet over and fold the two side flaps into the center.  Crease the score lines well and then adhere the flaps together with a strong adhesive like Scor-Tape


Score the bag at two inches from the bottom and fold  it up, making sure to crease the fold well.  (This will create a tall, skinny gift bag…for a shorter and wider bag, crease the bag higher during this step.)


Open the bottom flap and flatten it out by pressing the edges toward the center as shown.  Crease all folds well with a bone folder.


Fold the top and bottom flaps of the base inward to meet in the center and hold in place with a small piece of tape.  Trim a piece of coordinating paper from the collection to 3.75” x 2” and adhere it to the bottom for extra stability and a finished look.


Score each side 0.75” from the edge and crease the folds well to create the side folds. 


Open the bag up and embellish it with the large chipboard sticker and flowers and banners from the Noteworthy pack in the collection.


Punch holes in the top of the bag about an inch from each side and string ribbon through both the front and back sides of the bag.  Add a tag from the Noteworthy pack to the handle before tying each ribbon end in a knot on the inside of the bag.


Enjoy your new handmade gift bag…add treats or small gifts for a baby shower, wedding, or just a cheerful hello!

I hope you enjoyed this handmade gift bag tutorial and thanks so much for stopping by today.  Be sure to visit the FotoBella store to pick up this beautiful collection today!

Thursday, June 20, 2019

Bo Bunny Bee-U-Tiful You Wall Decor

Hello everyone,

Olivia here to share a recent Wall Décor I created using the gorgeous Bo Bunny Bee-utiful Collection.


For this one I decided to focus on the more Traditional Colors of the Bee and do some splashes of blue and purple that this collection comes with. 

For the Embellishments I used the Chipboard Embellishments and the Layered Chipboard Pieces. The Center Piece is a combo of the cut-out pieces from the Collection and the Noteworthy Ephemera. 


Tuesday, June 18, 2019

Mixed Media Canvas

Hello everyone. It is Olivia here and today I decided to gather up the courage to expand my comfort with Mixed Media. I found some canvases on sale at the local craft store and decided to give it a go.

So Step one I did a thin coat of White Gesso over the board using the Art Basics set Mixed Media Essentials.  I then did some stamping on the board using Staz-On Ink pad.  Since it is a water resistant ink this is great when you are planning to layer tons of other items and wet it up again.

Next I used my Art Ingredients Mica Powders, Sunny Yellow,Teal, and GreenI used two different stencils with the Heavy White Gesso.  The first one was Stamperia Butterflies. Then I used Stamperia Clockwise stencil as well. I then sprinkled embossing powders onto the textured areas and once they dried I melted the powder.  For part of the Stamperia Butterflies I used the Bo Bunny Glitter Paste.  

The Center of the piece is a recycled cardboard lid that I embellished with various chipboard from my stash, the same Mica Powders lists above and then finished it off with some of the adorable resin fairies.  

So I hope this inspires you to give it a try and see what you can make.  Fotobella is a fantastic shop to stop up on tons of great Mixed Media items. 


Saturday, June 15, 2019

Bo Bunny Summer Mood Cards


Hi all, it's Annie and today I'm back with three more cards made with the Bo Bunny Summer Mood Collection.  This bright and cheerful collection is perfect for summertime birthday, get well, and love cards!


I thought this ephemera piece was a great way to say "get well", so I started designing around it by creating a 6" x 6" card base and matting some of the fun pinwheel paper from the 6x6 paper pad with cardstock from both the coordinating Double Dot Paper Bundle as well as some black canvas cardstock.


After tying a bow of black organza ribbon around the background panel, I adhered it to the card base with tape runner.  Then I inked the edges of the ephemera piece and popped it up on top using foam tape.  I added a few iridescent yellow sequins around the card to finish it off.


This next card is perfect for summertime birthdays!  I matted a piece of patterned cardstock from the collection (it reminded me of confetti!) with cardstock from the Double Dot Paper Bundle, then adhered the entire panel to a 5" x 7" card base.


After adhering a few citrus pieces from the Noteworthy ephemera pack onto the card front, I placed the banner and tag layered chipboard pieces on top.  To finish the card off, I embossed a small birthday sentiment from my stash in white and popped it up beneath the tag with foam tape.


There is such a variety of papers in this collection that this last card looks completely different from the rest!  After matting some patterned paper with black canvas cardstock, I adhered the panel to a 5" x 7" card base.


Then, I matted one of the 3x4 cards from the collection with the same cardstock and framed it with these gorgeous watercolor flowers from the Noteworthy ephemera pack.  A small bow and an extra little ephemera sentiment finish the card off.

I hope you enjoyed these summertime occasion cards and thanks so much for stopping by today.  Be sure to visit the FotoBella store to pick up this beautiful collection today!

Sunday, June 2, 2019

Graphic 45 (Kaleidoscope) Art Journal

     Hello! Drea here with an art journal spread using the fabulous Graphic 45 (Kaleidoscope) I Want It All Bundle from FotoBella.com!


     The background was done in black and white using gesso, stamps, a stencil, and Dylusions Paints (White Linen and Black Marble). 


     I fussy-cut the elephants and zebra from the papers in the (Kaleidoscope) 12 x 12 Collection Pack.


     The zebra is hiding behind some grass that I cut by hand, using the green and purple peacock papers. Then I added the zebra Chipboard piece.


     To the center of my spread, I placed a tree that I cut by following the curves of the paper. Then I decorated it with some rhinestones and Stickers


     Some of the border strips also came from the Sticker pack.


     Such a fun and colorful Bundle available at FotoBella.com! Thanks for looking!