Saturday, October 31, 2015

G45 Rare Oddities Halloween Gift Card Bag Tutorial


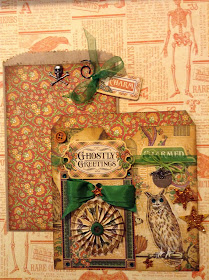
Halloween is just around the corner! It's ReNae here, with the FotoBella Design Team, and if you're like me, even though your goblins aren't children anymore, you still like giving a little something to your older spooks at Halloween.  These little gift bags are perfect for gift cards, gift certificates, and even money for your more sophisticated tricksters! 
Today I am sharing a tutorial with instructions on how to make these pretty gift bags.


Supplies List:

 Graphic 45 "Rare Oddities"Collection  "I want it all" Bundle by FotoBella 
(or if buying separately, Rare Oddities 6 x 6 Patterns and Solids paper,Decorative Chipboard, Sticker sheet, Ephemera CardsTags & Pockets, Ribbon and Trims, Rhinestones, Enamel Dots, and Sentiment Stamps-optional)
Halloween skull charms
Tim Holtz resin boneyard skulls
Inverted Scallop Circle Die
Circle Die
Scoring Board (to make rosette)
Doilies, or doily die
Star punch or die
Vintage Photo Distress Ink
Treat Bags
Scissors
Fiskars Surecut Scrapbooking Paper Trimmer 
Ruler
Adhesive
Scor-Tape 1/4" Double-Sided Adhesive
Dimensional tape or pop dots
Small clothes pins or clips 
Buttons


Using a scoring board, score a 1 1/2" x 12 " paper strip for your florets


Fold back and forth, and assemble your floret.
NOTE:  Refer to my post "The Beautiful Floret" on the FotoBella Blog to see a step by step tutorial on how to assemble a Floret.
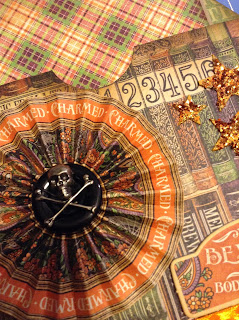
Assemble the florets and add buttons at center. Next, cut out and glitter some stars.  

Cut 3 rectangles measuring 4 1/2 x 6 3/4 from coordinating patterned paper.
Adhere to bags
Using Scor-Tape, adhere 2 pieces of patterned paper together, 
creating a sleeve for the bag.
The papers measure 5 1/2 x 5 3/4 (front) and 5 1/2 x 6 1/4 (back)
Ink the edges with Vintage Photo Distress Ink.

Now it's time to decorate the bags.  Using charms, fussy cuttings from the patterned paper, the glittered stars and the rhinestones etc. 

decorate your bags to your liking.
(Here are some photos of how I decorated mine)


Here are the finished bags I created.  
They are so pretty, they're a gift in themselves!
"You Bewitch Me" Bag and Sleeve
"Bewitched" Bag and Sleeve
"Charmed" Bag and Sleeve
These gift bags are quick and easy to make, and using other papers you can create bags at other holidays, or even birthdays, so please give them a try!  You'll love making them!

Happy Haunting!


ReNae

Friday, October 30, 2015

Graphic 45 "Rare Oddities" 3-D Framed Artist Trading Cards


Hi Bloggers,
ReNae here, from the FotoBella Design Team with a fun Halloween project share,  3-D Framed ATC's (Artist Trading Cards) I recently completed with the Rare Oddities "I want it all Bundle" by Graphic 45 and FotoBella!
I cut out a spider web, and put Stickles on it
to give the web a shimmery look
A spider and a skull make it a bit creepy!

The beautiful images and fun chipboard shapes in this bundle make a project like this a breeze!  Each card has a simple chipboard frame built around it which is about an inch deep.
I fussy cut the butterflies,
then used Stickles to give them sparkle!
I cut acetate the same shape as the image
to give the illusion of a glass case, then
I adhered a butterfly to the outside of the acetate.

Isn't it BOO-ti ful?

I cut two layers of the owl, to give it dimension.
It was a HOOT making it!
I glittered the stars, moon and bats to 
give this card an eerie feel! 

ATC cards are fast and fun!  And with a Graphic 45 paper "I want it all" Bundle, you have everything you need to create an amazing ATC!


Happy Halloween!
ReNae

Supplies used in today's project include:
Graphic 45 Rare Oddities "I want it all!" Bundle
Tim Holtz Vintage Cabinet Card Die
Tim Holtz Mini Cabinet Card Die
Chipboard
Stickles Glitter Glue
Gold, Orange and Black Glitter
Scissors
Halloween Charms

Thursday, October 29, 2015

MME Cozy Christmas Tis the Season Layout

Hello welcome! Today I wanted to share a layout I did using the My Mind's Eye Bundle Cozy Christmas  from FotoBella.

I love this line! There are so many fun embellishments with it.  I need to order some more paper so I can use the rest of my embellishments.

I took this picture last year of the cherry blossom tree in my front yard. I thought it was just a pretty picture. Do you scrap pictures of your yard? 


Have a beautiful day! Smiles, Jessica

Tuesday, October 27, 2015

Basic Grey Juniper Berry Deer Charm Necklace

Hello everyone! Jeri here, with a jewelry piece I made from the festive Juniper Berry Bundle by Basic Grey I received this month from FotoBella

As if the 'bundle' wasn't enough, FotoBella has now created more fun items to add to them! With this bundle they added some FotoBella Juniper Berry Charms.
These charms are just amazing, you really need to check them out. They come in great sizes, and are great quality.

I fell in love with this large, 2.5" Deer Charm! 
I usually make a point to wear an entirely new outfit on Christmas, and I just knew I had to make a necklace out of this adorable charm!


Monday, October 26, 2015

#NationalPumpkinDay

MMM… Pumpkin!

Celebrate National Pumpkin Day on this chilly morning and warm up with a yummy Pumpkin Spiced Latte, or feast on a piece of delicious Pumpkin Pie for breakfast.


How about light that pumpkin spice candle, cuddle up with a warm blanket and enjoy some shopping at FotoBella.com for all things Pumpkin!


Basic Grey Juniper Berry Gift Box Tutorial

Juniper Berry Gift Box Tutorial


Check out How to Make a Juniper Berry Gift Box by FotoBella Papercrafting Supplies on Snapguide.


 Supplies:
Garland Sheet, Workshop Sheet, Cover Sheet, Mixed Tags, FotoBella Juniper Berry Fiber & Embellishment Pack, FotoBella Juniper Berry Charms
Light Blue Ink Pad
Black Spray Paint
Empty Tea Box
ModPodge
Sponge Brush

Tools:
Paper Cutter
Ruler
Scissors
Double Sided Tape
Hot Glue Gun

If you have an empty tea box on hand, it works perfectly as a gift box! 


With some black spray paint, cover the box entirely. Make sure not to go over it too much, the wet paint will warp the box.


Wait until the box is fully dry. Grab the Garland Sheet. Place it on top of each side of the box and mark where to cut. I left about 1/16” of an inch on the outer edges. This way, the black will show.


Using a paper cutter, cut each paper piece for each side, top and bottom.  


Once you have all the piece cut to your liking, find some ModPodge and a sponge brush. Carefully sponge a thin layer onto the box, and then place the paper on top of it. Try to get it centered on the first try, because trying to pull the paper off will rip it.  


With the Metallic Silver Paint Dabber, dab color directly onto the circle stamp. Stamp a few random places on the box.  


With the Silver Stickles Glitter, outline a few stars and dots on the paper print. Set aside to dry.


 Find a charm you like from the FotoBella Juniper Berry Charm Pack.  


Pull out the black ribbon and black brad from the FotoBella Fiber & Embellishment Pack.  


I love the cover sheets of bundles! They offer the same prints in a different scale, and shapes!
Cut out the Black rectangle and the White Tree rectangle.  


Cut a 3” tag from the Workshop Sheet. Punch a hole in the top, and ink the edges.
With the rectangles, cut triangles out of one side of each. Punch a hole at the square end. 


Pull a white flower from the Petaloo Blossoms pack. With the Silver Stickles Glitter, cover the yellow flower center. 


Grab a round chalkboard tag from the Mixed Tag Pack.


Make sure the Stickles Glitter is dry on your box. Grab your ribbon and tie up the box how you like.  


Heat up the Hot Glue.
With the brad, secure the charm to the round tag. With the string on the round tag, tie it through the holes of the paper tag and flags. Keep some space when tying, so the round tag hangs lower.
Once you have all of this put together, using the hot glue, secure the flower over the hole of the paper tag and flags. You can either tie the tag on, or hot glue it to the top of the box.