Monday, March 30, 2015

Home Sweet Home Card

Today's card is made with the new Home Sweet Home Bundle by Graphic 45... a 1930's Americana paper collection with gorgeous imagery from days gone by...Cotton aprons, checkered tablecloths, clothes lines, vegetable gardens, hand-sewn quilts, canning jars,  Grandma's recipes, Mom and apple pie!


I used the 12 x 12 Home Sweet Home paper pad, the 6 x 6 Patterns & Solids pad, and decorative chipboard for this card, adding blue lace and yellow yarn from the Graphic 45 Home Sweet Home coordinating Fibers and Embellishments selected by FotoBella!
Adding decorative chipboard and lace adds dimension to your card!

Graphic 45 makes it easy to create beautiful projects with all their wonderful products, and FotoBella makes it even easier, by making it all available to you in one big beautiful BUNDLE!*  

Happy Creating!
ReNae

*This scrapbooking Bundle includes the Home Sweet Home 12" x 12" paper pad (3 sheets of 8 double-sided designs), 6"x6" paper pad (3 of 12 double-sided designs), three packages of coordinating cling stamps, decorative chipboard, journaling chipboard, 4x6 & 3x4 Journaling & Ephemera Cards, tags and pockets, banners, 12"x12" decorative and alphabet combo sticker sheets, and exclusive FotoBella paper storage box.


Friday, March 27, 2015

Graphic 45 Precious Memories Card

Hello!  It's Design Team member Apryl with you today.  I think that having handmade cards on hand are always a plus.  Graphic 45 Precious Memories I Really Want It All Bundle offers a lot of goodies for making cards for all those baby occasions that come up: showers, births, announcements.  The bundle includes the 8x8 paper pad and the 6x6 paper pad which are perfect for card makers.    


This appears to be an envelope with a card coming out of the top.  But in fact it is all part of the card. I made it so from the front, it appears that way, but it really a mock envelope.  I attached a heart to the and embellished with the look of paper ribbon bows and a sheer ribbon tied in a bow at the center.  


This is a really cute and simple card.  And of course, it would be complete with out a little stickling.  I used blue distressed Stickles to outline the heart and diamond Stickles to add some sparkle to the flowers in the bottom right hand corner, paper ribbon and the "Welcome" in the "Welcome Little One" sentiment at the top of the card.  

The color scheme is a mixture of blues and pinks, so this card can be used for either a boy or a girl.  Baby Shower, New Arrival, Birth Announcement?  I think this would work for any of those.  If you like what you see and want to try it for yourself, or you've been inspired to create your own style of cards using this collection, you can find Graphic 45 Precious Memories at FotoBella.com.  

Thanks for stopping by and have a fabulous day!


Thursday, March 26, 2015

Let's Make a Card Today! (Tutorial)

Don't you just LOVE Graphic 45 Paper? I know I do!  Today I am going to show you how to make a quick and easy card using this adorable paper collection!  We will use the Home Sweet Home "I want it All" Bundle by FotoBella!


You will need:
1 piece of white card stock measuring 4.25" x 5.5", 

1 piece of the red gingham paper also cut at 4.25" x 5.5",  
1 Home Sweet Home die cut, 
2 chipboard punch-outs shown above, 
6 " length of ribbon, and 4 inches of yellow yarn. 
(both included in the FotoBella kit)
You will also need a card cut at 4.25 x 5.5" (not shown)
With ink applicator, use blue Distress Ink and distress the edges 
of the Home Sweet Home die cut. Cover all the white edges 
with the blue ink so no white shows.
I like to build my card front on a separate piece of card stock 
before I adhere it to the final card, that way if you make a mistake, 
you don't have to throw away the entire card!  

Cut your card front (4.25" x 5.5 ") from white card stock 
and follow the directions below!
Adhere the red gingham paper to the card stock using tape runner or ScorTape.
Distress the edges if desired.

Place ribbon in the center of the card and tape down the edges.
Center the die cut and adhere to card base with pop dots  

Select the chip board pieces and adhere them to card front as shown.
I used pop dots but any dimensional adhesive will work fine
If you turn the card to the side you will see the dimension!

With your wet glue, add the tiny chipboard flower dots to your card. 
Then with a tape runner adhere the card front to the actual card. 
This will hide the edges of the ribbon inside.

Note: I added the "homegrown" chipboard tab and the flowers (above) 
to the card after the first photo had been taken. I apologize for any confusion.

Your card will look like this when finished.  See how easy that was?
Designing with Graphic 45 paper isn't hard when you have all the embellishments at your fingertips, and it's "Easy as Pie" with the "I want it All" Bundle by FotoBella & Graphic 45!

This scrapbooking kit includes the Home Sweet Home 12" x 12" paper pad (3 sheets of 8 double-sided designs), 6"x6" paper pad (3 of 12 double-sided designs), three packages of coordinating cling stamps, decorative chipboard, journaling chipboard, 4x6 & 3x4 Journaling & Ephemera Cards, tags and pockets, banners, 12"x12" decorative and alphabet combo sticker sheets, and exclusive FotoBella paper storage box.

Happy Creating!
ReNae

Wednesday, March 25, 2015

Welcome to the show! Bo Bunny Carnival!

Hello FotoBella fans!  It's Apryl with FotoBella design team with you today.  Have you been to the Circus lately?  We took our kids to the Circus for the first time about a year ago.  So, how happy was I that the latest I Want It All Bundle I received from FotoBella was Bo Bunny Carnival!  Ok, yes, it's called "Carnival" but there is plenty of Circus theme stuff in it.


I really had a tough time deciding what to use from this bundle because it's all so great.  I wanted to keep it bright and fun.  The blue and orange color scheme went perfect with these two photos of the tent entrance and the Ring Master's grand intro.  There's a lot in this layout, so be sure to spy all the fun details.  


There's some great glittered chipboard pieces like the big top, and pieces in the Ephemera package never disappoint.  That's where the large blue gem is from and the playing cards.  I cut some of the film strip for a banner effect behind the "Welcome to the Show".   

Thanks for stopping by today for some Circus fun.  There's more to come I assure you.  Hope you have a fabulous day!


Monday, March 23, 2015

Personal Monogram

Happy Day to each of you.  Today I wanted to share a quick tutorial of how to create fun monogram letters.  I created this one for my mother-in-law using the Graphic 45 Artisan Style Bundle.  It is really easy.

I started with a plain wood letter. I selected a B but you could do anything.  I then painted the back side black.

  I then traced the letter onto the paper I wanted to use.  
 Then cut the paper out and attached it to the front side of the letter.  I then added some paint around the edges to finish it off a little.

Then selected some of the embellishments from the line to create clusters on opposite sides.

I then added a few dangling beads and bling to finish it off.


Overall finished product.

Hope you enjoyed. -Jessica

Saturday, March 21, 2015

National Craft Month - We keep the fun coming!

Have you been having a crafty month so far?

We would love to see all the fun projects you have been working on. Head over to our Facebook page and post your work!

As promised, we have more great techniques from the fabulous FotoBella Design Team!

Design team member Apryl gives us a good example of adding texture to a layout using craft paint.  This is just white paint added to the background paper using a sponge brush. We love this!


Everyone loves glitter right? Well we do, and here is a fun and creative way to add glitter to your projects from design team member Sarinda. Choose some cardstock shapes for your project. Paint Distress Stains in Worn Lipstick and Evergreen Bough strips, let dry. Coat strips with Multi Medium Gloss add pink glitter to the Worn Lipstick strip then add clear glitter to the Evergreen Bough. Let Dry.


We hope you are inspired to keep creating!


Friday, March 20, 2015

Heritage Layout Tutorial

Heritage Layout 


Supplies:
Anthology Page
Ancestors Page
Lifetime Page
Roots Page
Keys Page
Ephemera
Chipboard Stickers
Buttons
Stickers
Rub-Ons
Jewels
Wood Shape
Tim Holtz Distress Ink in Gathered Twigs
Jute
Letter Stamp
Double Sided Tape

Photo Sizes:
6.5” x 5”
 4” x 4”

Tools:
 Hot Glue Gun
 Paper Cutter
 Hole Punch
Scissors

For this focal piece you can either use a wood shape or a chipboard piece. I chose a wood piece. Grab the Tim Holtz Distress Ink in Gathered Twigs.


Smudge the distress ink around the wood, heavier on the edges and lighter in the center.


With a stamp shape of your choice, stamp the full wood piece. Remember the ink will spread in the wood grain, so the details will slightly get lost.
Cut the Family word out of the Lifetime Page and grab the Camera Rub-On. I secured these with ModPodge.
Set this aside to dry.


Now to start the page. Find 2 pictures you love and cut them 6.5” x 5” and 4” x 4”. Pull out the Anthology Page.

 
With the Ancestors Page, mat the images. I secured mine with double sided tape.


Pull out a string of Jute, and cut longer then the length of the page. Lay on the left side of the page, and place embellishments as you like them.


Cut this little piece out of the Keys Page. Spray with water, scrunch, and then rub the Gathered Twigs Ink pad over it slightly. Give it a worn look. Set aside to dry


Grab your custom wood décor, Ephemera Ribbon, Chipboard Stickers and Buttons. Place them at the bottom right side of the layout, under the images. Once you have them laid out as you like, secure them with your hot glue gun.


In the top left-hand corner, measure 1” in, and slightly down from the top. Punch a small hole and thread the Jute through to the back. Secure the tail to the back of the page with tape or glue.
 

 Find the ‘Story’ Chipboard Sticker, and stick it to the top of the left side of the page, covering the hole where the Jute has gone through.
Grab this paper piece that you had set aside to dry, some brown ink and a letter stamp. With a few sticker and paper flags, secure those to the page under the Jute. Then, with double sided tape, secure the paper piece, and stamp the letter on top of it.


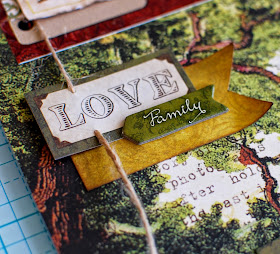
Cut out this “Love” from the Roots Page, and punch 2 small holes in it as shown in the image. Thread the Jute through the holes and place it in the location you prefer. Secure a paper flag under it, and then tape the “Love” piece down. I added the Family Chipboard Sticker on top of them as well.
 

Thread the Jute through the holes of the Leaf Chipboard Sticker and press into the paper. With a hot glue gun, secure the flower to the page and add a Jewel to the center. Add the Memories Chipboard Sticker below that and while the hot glue gun is still hot, secure some colored buttons below.


Punch a small hole at the bottom of the page, just as you did to the top. Thread the Jute through and tape it down on the back of the page.
You can go back through the page and add jewels or other embellishments.
Your layout is now finished! 


Wednesday, March 18, 2015

Fancy That Recorded Wedding Album

Springtime means Wedding Time!
I can't think of a more heartfelt, beautiful wedding gift for someone dear to you, then a handmade album.

For this album, there is no better Bundle then the new Fancy That Bundle by My Mind's Eye. Every detail of this bundle is just perfect, from the Brads to the gold details. And there was no better album then the My Mind's Eye Record It Album. This album comes with cardstock dividers, papers and plastic image holders.

In addition to those amazing products from FotoBella I also used Tim Holtz Distress Inks, Ranger Paint Dabbers, Prima Marketing Color Bloom Sprays, and some stencils.


Look at these adorable Tux and Dress brads!


With the cardstock dividers, I separated them into Wedding, Reception and Honeymoon. I added an area for them to journal about dates, locations and thoughts.


Each journaling card in this bundle is just exquisite! I purposely left blank areas in these plastic images holders so they can add the images that were meaningful to them.


I can't wait to see how they complete this album with more memories!