Thursday, November 28, 2013

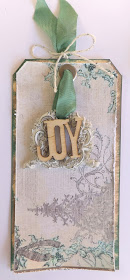
FotoBella.com Prima Holiday Jubilee Gift Packaging


Sarinda here with some packaging ideas from Prima Holiday Jubilee I want it all collection from Fotobella.com. I love how easy Prima is to work with.

This bundle is loaded with flowers, a ton of wood cutouts that I love.  Including great brads, flair buttons and some amazing resin embellishments. It is hard to stop adding goodies to the page. With this project I wanted to use a limited color palette and more of a winter feel.

Hope this inspires your treat bags and gift items this season.

Warmly-
Sarinda

 Here is what I used:


Tuesday, November 26, 2013

www.FotoBella.com and Prima Holiday Jubilee Collection Card Tutorial


Hello Creatives....

I have a surprise for you today.... A Video tutorial.

Using a collection by Prima, Holiday Jubilee from www.FotoBella.com. This collection is wonderful for the soft colors, muted reds and wonderful aqua.  I am not a huge fan of the bright red and green this collection is right up my alley.

Wishing you a creative, warm Holiday.
Much love and kindness to you and yours.
Sarinda


Here is the tutorial.


What I used:


Monday, November 25, 2013

Bo Bunny Pincushion Any Occasion Card


Hello there!  It's Apryl with Fotobella's Design Team sharing a card I made with Bo Bunny's Pincushion I Want It All Bundle from Fotobella.com.

Having cards on hand that work for any occasion are always good to have around.  Bo Bunny's Pincushion collection is a great collection to work with for such a project.  I love the colors and versatility of this line.  


The Pincushion collection has a handmade look and adds charm to all your projects.  Fotobella offers the I Want It All Bundle so that you can get all the goodies for a great price.  

Thanks for stopping by!


Friday, November 22, 2013

FotoBella.com Prima Holiday Jubilee Door Wreath


Happy Winter to you....

Sarinda here with winter door wreath made from Prima Holiday Jubilee I want it all collection from Fotobella.com. I love how easy Prima is to work with.

This bundle is loaded with flowers, a ton of wood cutouts that I love.  Including great brads, flair buttons and some amazing resin embellishments. It is hard to stop adding goodies to the page. With this project I wanted to use a limited color palette and more of a winter feel.

Hope this inspires you this Holiday season.

Warmly-
Sarinda


Here is what I used:

Thursday, November 21, 2013

Bo Bunny ~ Woodland Winter Brrrthday Card

Hello! Drea here with my very first post with the card I created from the new Woodland Winter I want it all bundle by Bo bunny from Fotobella.com. I was SO excited to get this fabulous bundle, and I'm still drooling over it!!

I was inspired by this sketch. I started by cutting a rectangle 9" x 5" using the reverse side of Woodland Winter Mittens paper. From the reverse side of Woodland Winter Journal paper I cut a piece at 5' X 4 1/2".Using my Tim Holtz distresser I distressed all of the edges.

Then I  used some gesso over the edges and immediately added some white glitter to it. I glued the pieces onto this same kraft cardstock that are in these photos, and folded it in half to make a card.

My next idea didn't come out the way I intended it to, but ended up being a happy mistake. I used a doily template on the bottom with a little too much gesso, that you couldn't even see the doily design except for on top, which I knew I would be covering. But because it looks like snow, I think it worked it out OK. As it was still wet I added the snowflake sticker that came in my bundle, and then added more of my white glitter.

I like to go with the patterns that are on paper, such as the diamond shapes that I cut out from the Woodland Winter Scarf paper. I inked the edges with some Distress ink (faded denim) and then outlined them with some Stickles (waterfall). I also used the Stickles to make the dots in the centers of the stars.

I wrote on the sticker  frame using a white pen,  and finished it off with the mittens button that I threaded with some white fiber.

Thanks for looking!

DT Member:

Wednesday, November 20, 2013

Adore Antique Gift Tag

Glitter and Antiques... Two of my favorite things in life.


Supplies:
 Charming Glittered Paper
Antique Chipboard
Antique Pockets
Antique Ephemera
Antique Alpha & Word Stickers
Antique Decorative Tape
Double Sided Tape
Brown Ink
Tools:
Scissors


 Find this Antique Pocket.
Cut a 3” x 2” piece out of the Charming Glittered Paper


Pull out the pictured Antique Ephemera
With Brown Ink, rub the ink pad on the edges of all pieces.


 Use double sided tape and attach the chevron piece, the ticket stub behind it and the Adore piece on top of the star.
With the Antique Sticker ‘My Darling’, place this on top of the Adore piece. Place the silver glittered arrow on the bottom of the Adore piece.


With this adorable Antique Decorative Tape, grab a long piece and fold it in half, so that you are sticking it together. This creates your ‘ribbon’.
Punch a hole in the top center of the chevron piece and tie the Decorative Tape Ribbon through it.
You now have a finished Adore Antique Gift Tag. 


Monday, November 18, 2013

FotoBella.com Teresa Collins Santa's List 12 Days of Christmas Advent Calendar


Hello There-

Sarinda here with a 3D 12 Days of Christmas project that was created from Teresa Collins Santa's List I want it all buundle from FotoBella.com. I did add a few extras that are not included in the bundle. I wanted to have feet on the box so I made them out of wood disks, plastic beads and a bead cap. As well the tree stick pins on the top. 

I made the box with drawers with my Silhouette Cameo from a Lori Whitlock cutting file. Make sure you get both files, there are two you will need. She also has a great video tutorial on YouTube so that you can follow along and make the box with her.

Enjoy-
Sarinda


Here is what I used: